After researching all manner of fruit-and-pastry desserts, I decided my fresh-picked Concord grapes would go in a cobbler. I based in on this recipe. My version uses less sugar because I didn’t seem to need more, and is vegan.
Ingredients:
2c grapes. It will be less than 2 cups after skinning and seeding.
113g Smart Balance (1 stick butter equivalent)
1c (100g) flour
1.5 tsp baking powder
pinch salt
1c (200g) sugar (can be treated as a dry ingredient this time)
Heat grapes and skins together in a saucepan until grapes fall apart a little. You can add a couple tablespoons of sugar here but they get sweeter from cooking, too.
Prep for baking
Preheat oven to 350F.
Melt butter in 10 inch cast iron skillet on the stovetop.
Make the batter
Mix dry ingredients in a bowl.
Using the well method, add wet ingredients to dry.
Assemble
Pour the batter into the pan.
Put the grapes on top of the batter. The batter will rise up during baking.
Bake
25-30 minutes.
If needed (pastry is spongy and done but not browned), broil a couple minutes to get the top golden brown.
As is widely noted in the literature, the hydration level of a dough affects several properties of the resulting bread, most notably hole size. However, preferred hydration levels for certain types of bread are not agreed upon with much precision. One reason for this uncertainty in the field is that hydration level affects different flours differently (see for instance http://www.artisanbreadinfive.com/2008/02/10/qa-flour-and-water). Having recently been burned by this imprecision, the author undertook the following study to offer concrete data on the affects of a variety of hydration levels on King Arthur Unbleached Bread Flour.
Method
This study manipulated one factor, water content, which was measured in baker’s percentage, the ratio of the ingredient (water) to flour, by weight. The factor had four levels: 60%, 70%, 80%, and 90%.
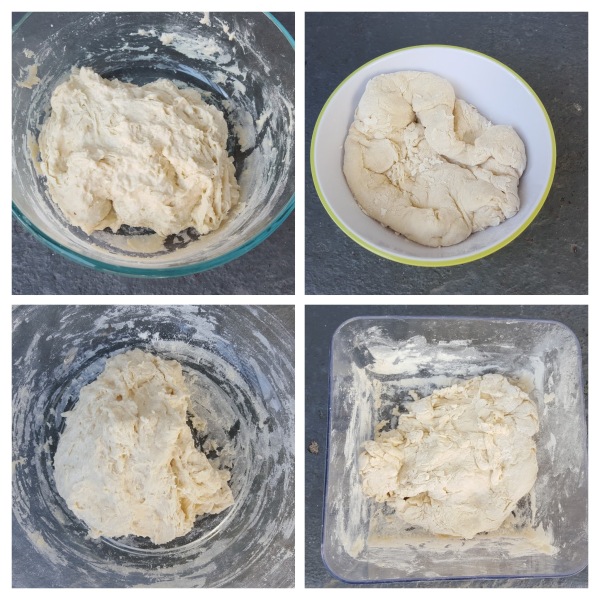
The water was brought to 100F and mixed with 3/4 tsp (approximately 1 baker’s percent) of active dry yeast in a non-metal bowl. This mixture was left for 10 minutes to allow the yeast to become active. Then 200g of flour was mixed in until none of it was dry, to the extent that this was possible. The 60% dough was unable to incorporate all of the flour with the mixing method utilized; this was likely due to experimenter error as even drier doughs have been recorded in the literature. The results of this step are shown in Figure 1. All doughs had an internal temperature upon mixing of approximately 75F in a 62F room.
Figure 1. Doughs upon mixing. From upper right, clockwise: 60%, 70%, 80%, 90%.
The resulting mixture was left to autolyze for approximately 20 minutes. During this time, the flour absorbs water, which then allows enzymes in the flour to break down some of the starches into sugars. The yeast feed on these sugars and multiply before the addition of the salt, which limits their growth. The absorption of water by the flour also makes the dough feel drier, which is helpful for working with higher hydration doughs. After this pause, 3/4 tsp (approximately 2 baker’s percent) was incorporated into the dough. The results of this step are shown in Figure 2.
Figure 2. The doughs after autolysis. Clockwise from upper left: 80%, 60%, 90%, 70%.
The dough was then left to ferment for 2-3 hours, until doubled in size. Approximately every half hour, the dough was stretched and folded as described in Robertson and Wolfinger (2010).
An exception was made to this method for the 60% dough, which would be less likely than the others to develop and organize its gluten in the later stages (as the method used here was developed for higher hydration doughs). It was kneaded for a few minutes, short of fully developing the gluten. In contrast, the 80% and 90% doughs developed gluten to the point of showing translucent windows with only these occasional folds.
Figure 3. Translucent “windows” show effective gluten development in the 80% and 90% doughs. These took little to no effort to stretch (the 80% one was created by accident when a the dough stuck to the author’s finger) and no kneading.
When doubled, the dough was preshaped into a boule, with focus on creating some surface tension on the top of the boule. During all steps, the dough was covered with plastic wrap, but from preshaping on a layer of olive oil was added between the dough and the plastic wrap to prevent rupture of this top layer upon removal of the covering.
The dough was then rested for 30 minutes and shaped again. This began the phase of proofing, which varied in time. When available, the proofing dough was inverted into a floured banneton to support the boule’s shape. Proofing was considered to be finished when the dough slowly recovered from being poked; unfortunately, successful proofing did not guarantee an available oven and the 90% dough may have been overproofed while waiting for space.
When ready to bake, the oven, containing a tagine, was preheated to 500F. The dough was inverted again into the tagine, scored in a square pattern with a lame, and put into the oven covered with the tagine lid. The oven temperature was reduced to 450F (see for example Lahey, 2009) and the bread was baked for 20 minutes. Then the cover was removed but left in the oven to remain preheated for following bakes (see Appendix A), and the bread was baked uncovered for an additional 20 minutes. An exception to this was the 60% bread, which was done after the first 20 minutes and removed. All loaves were cooked to an internal temperature of at least 210F.
The loaf was then removed from the oven and left to cool completely on a wire rack.
Results
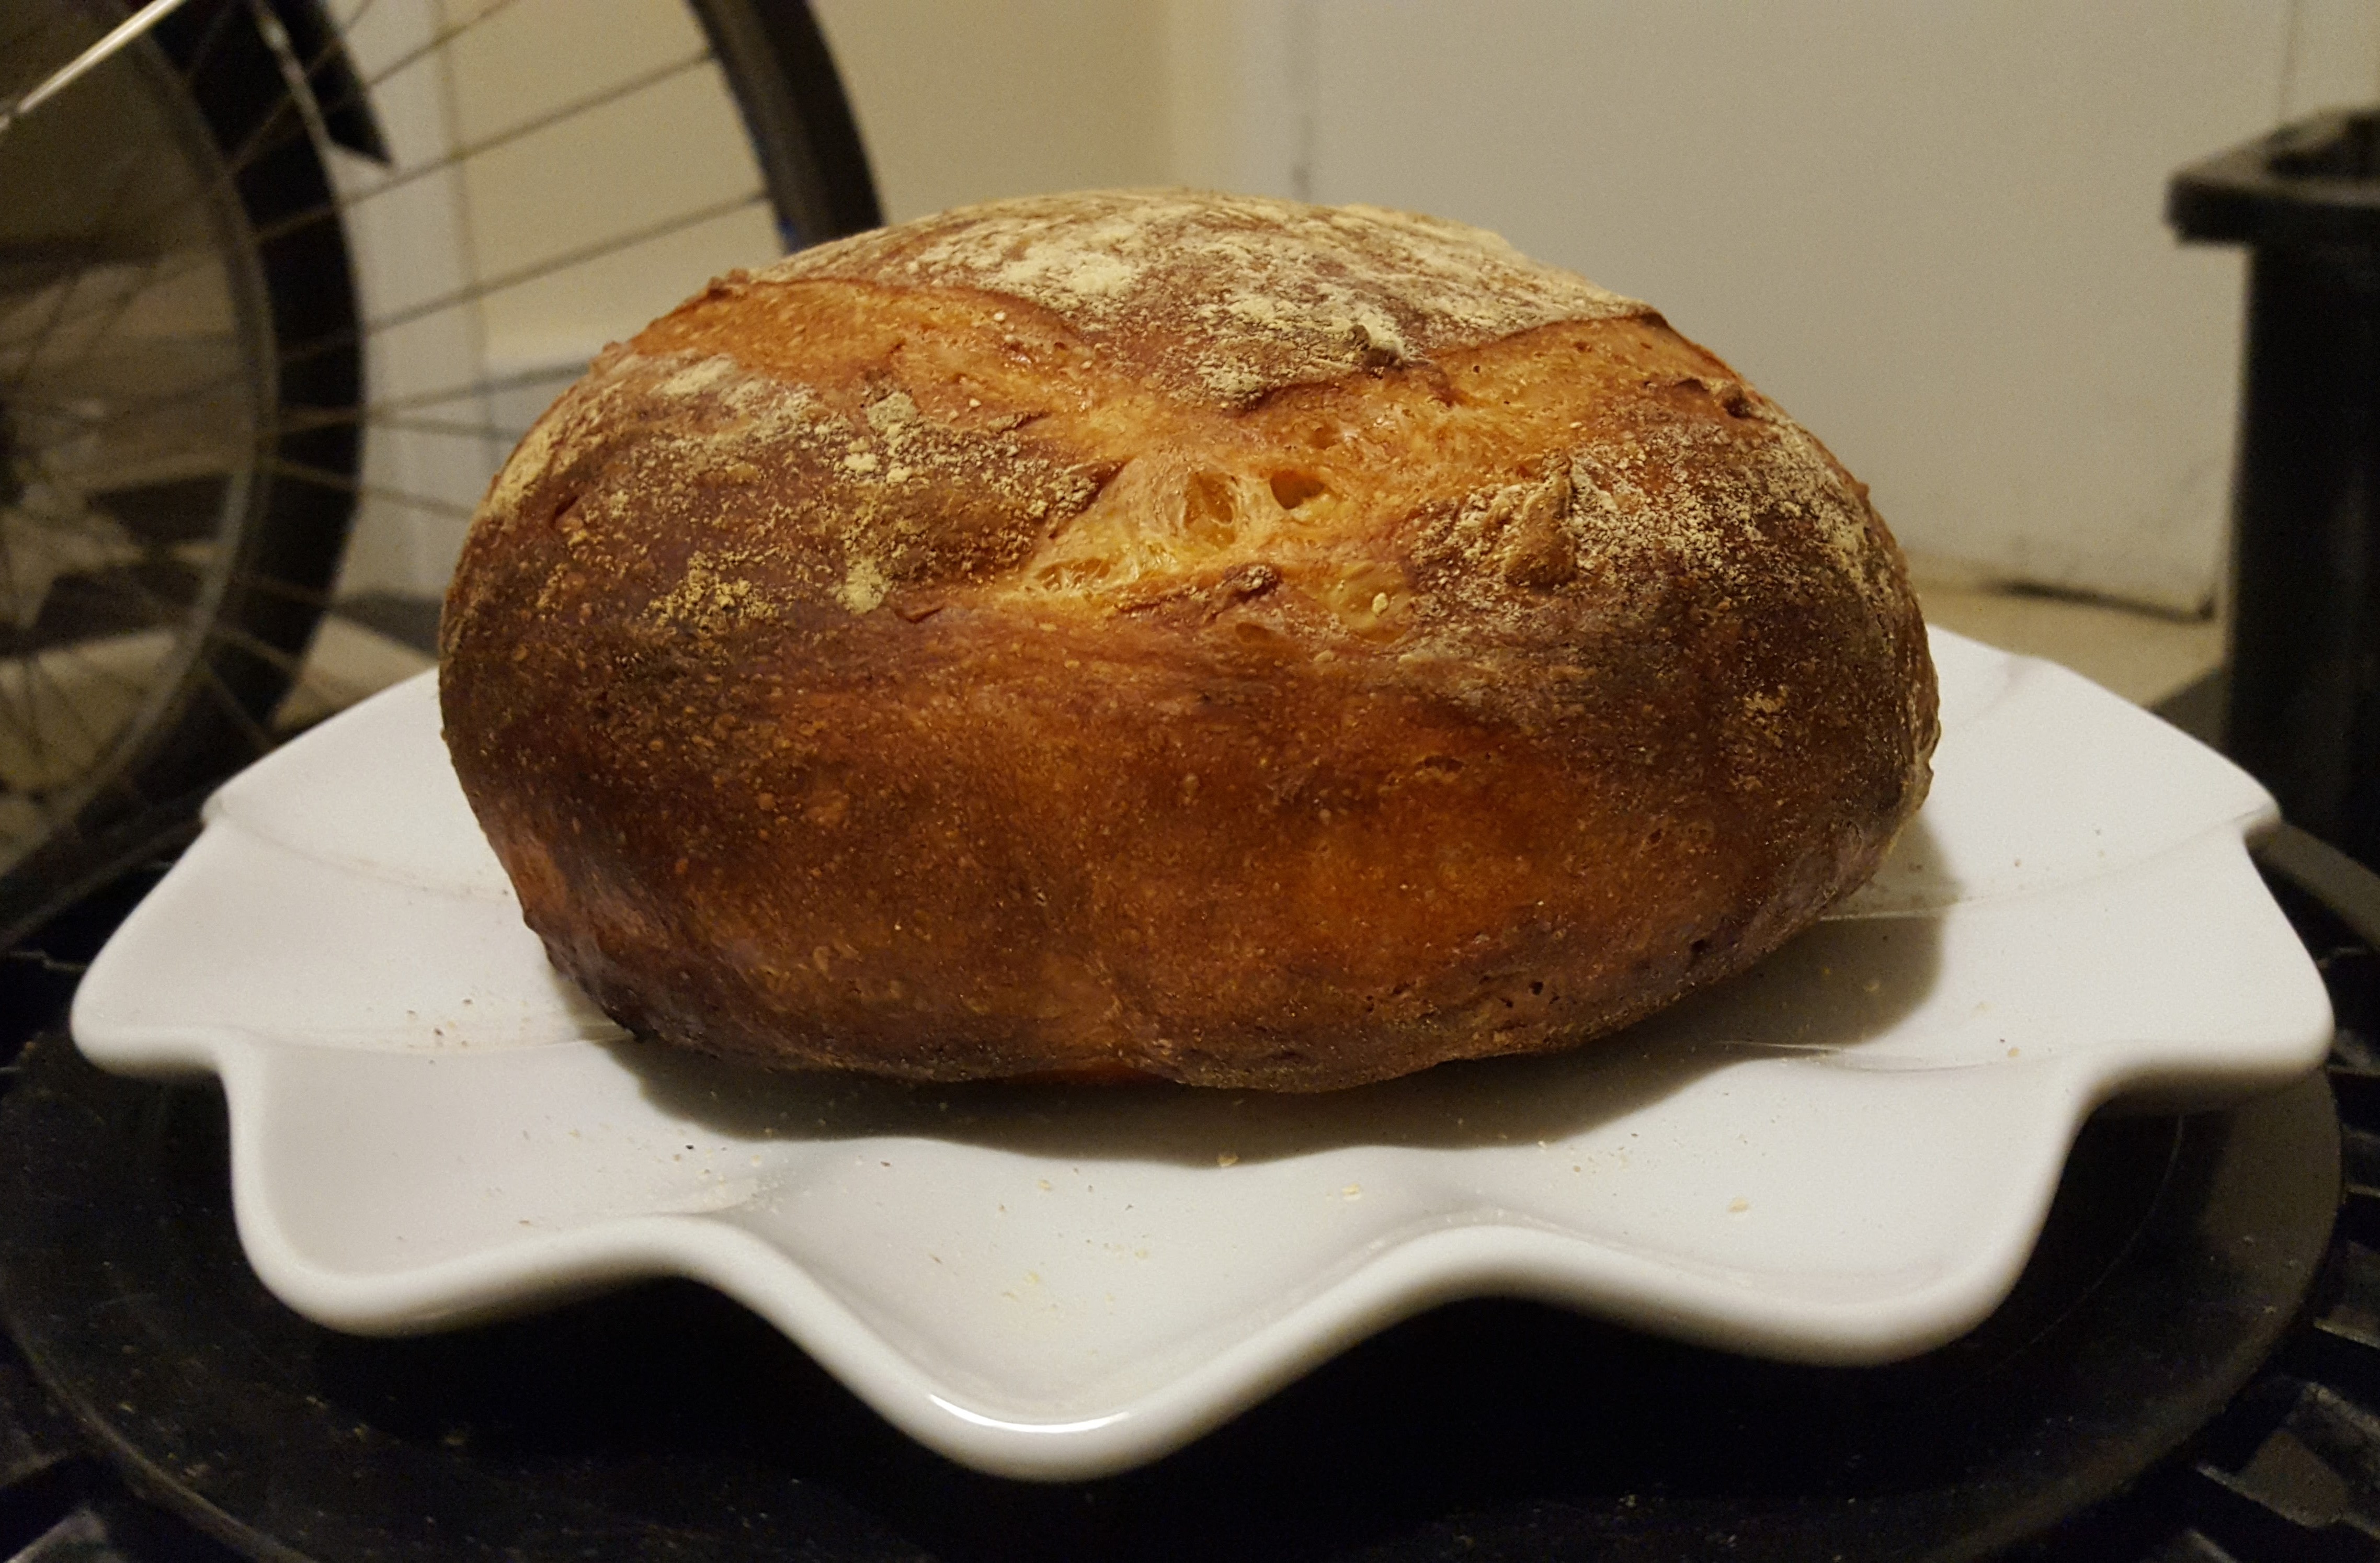
We present here the raw, baked data.
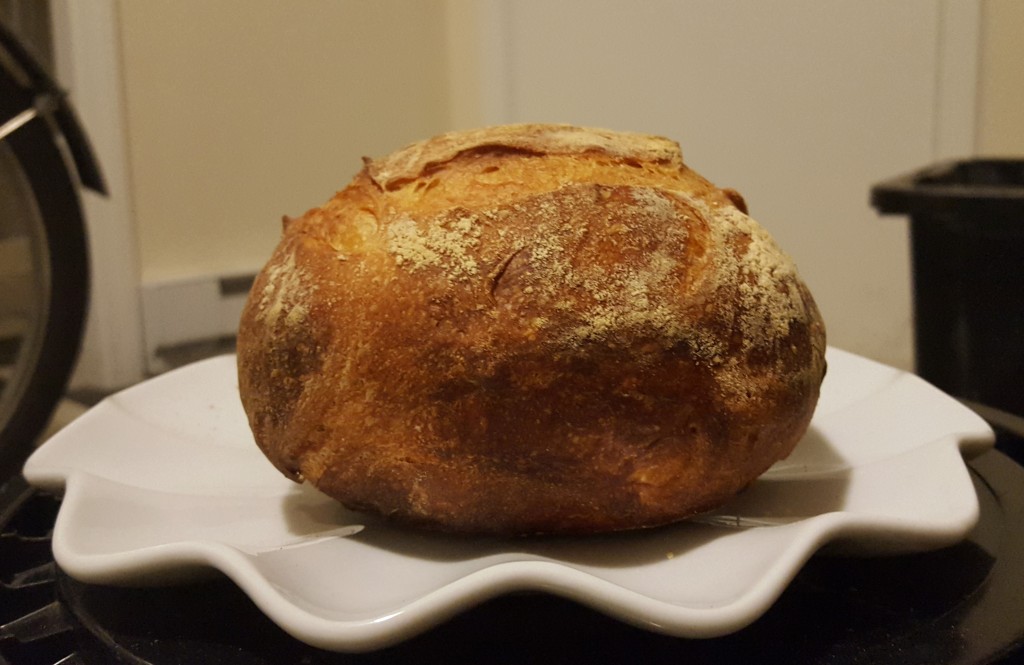
Crust of 60% dough.
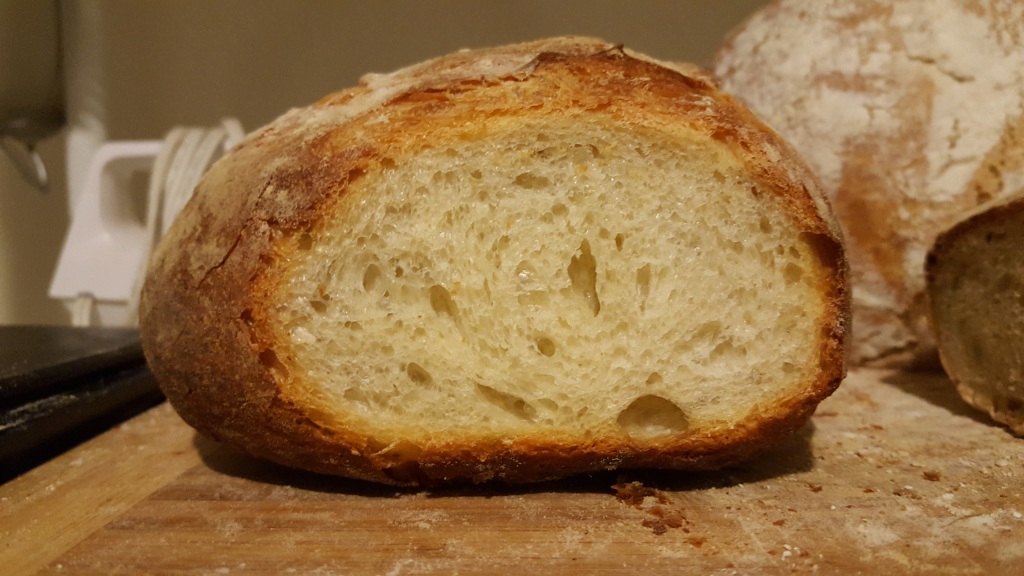
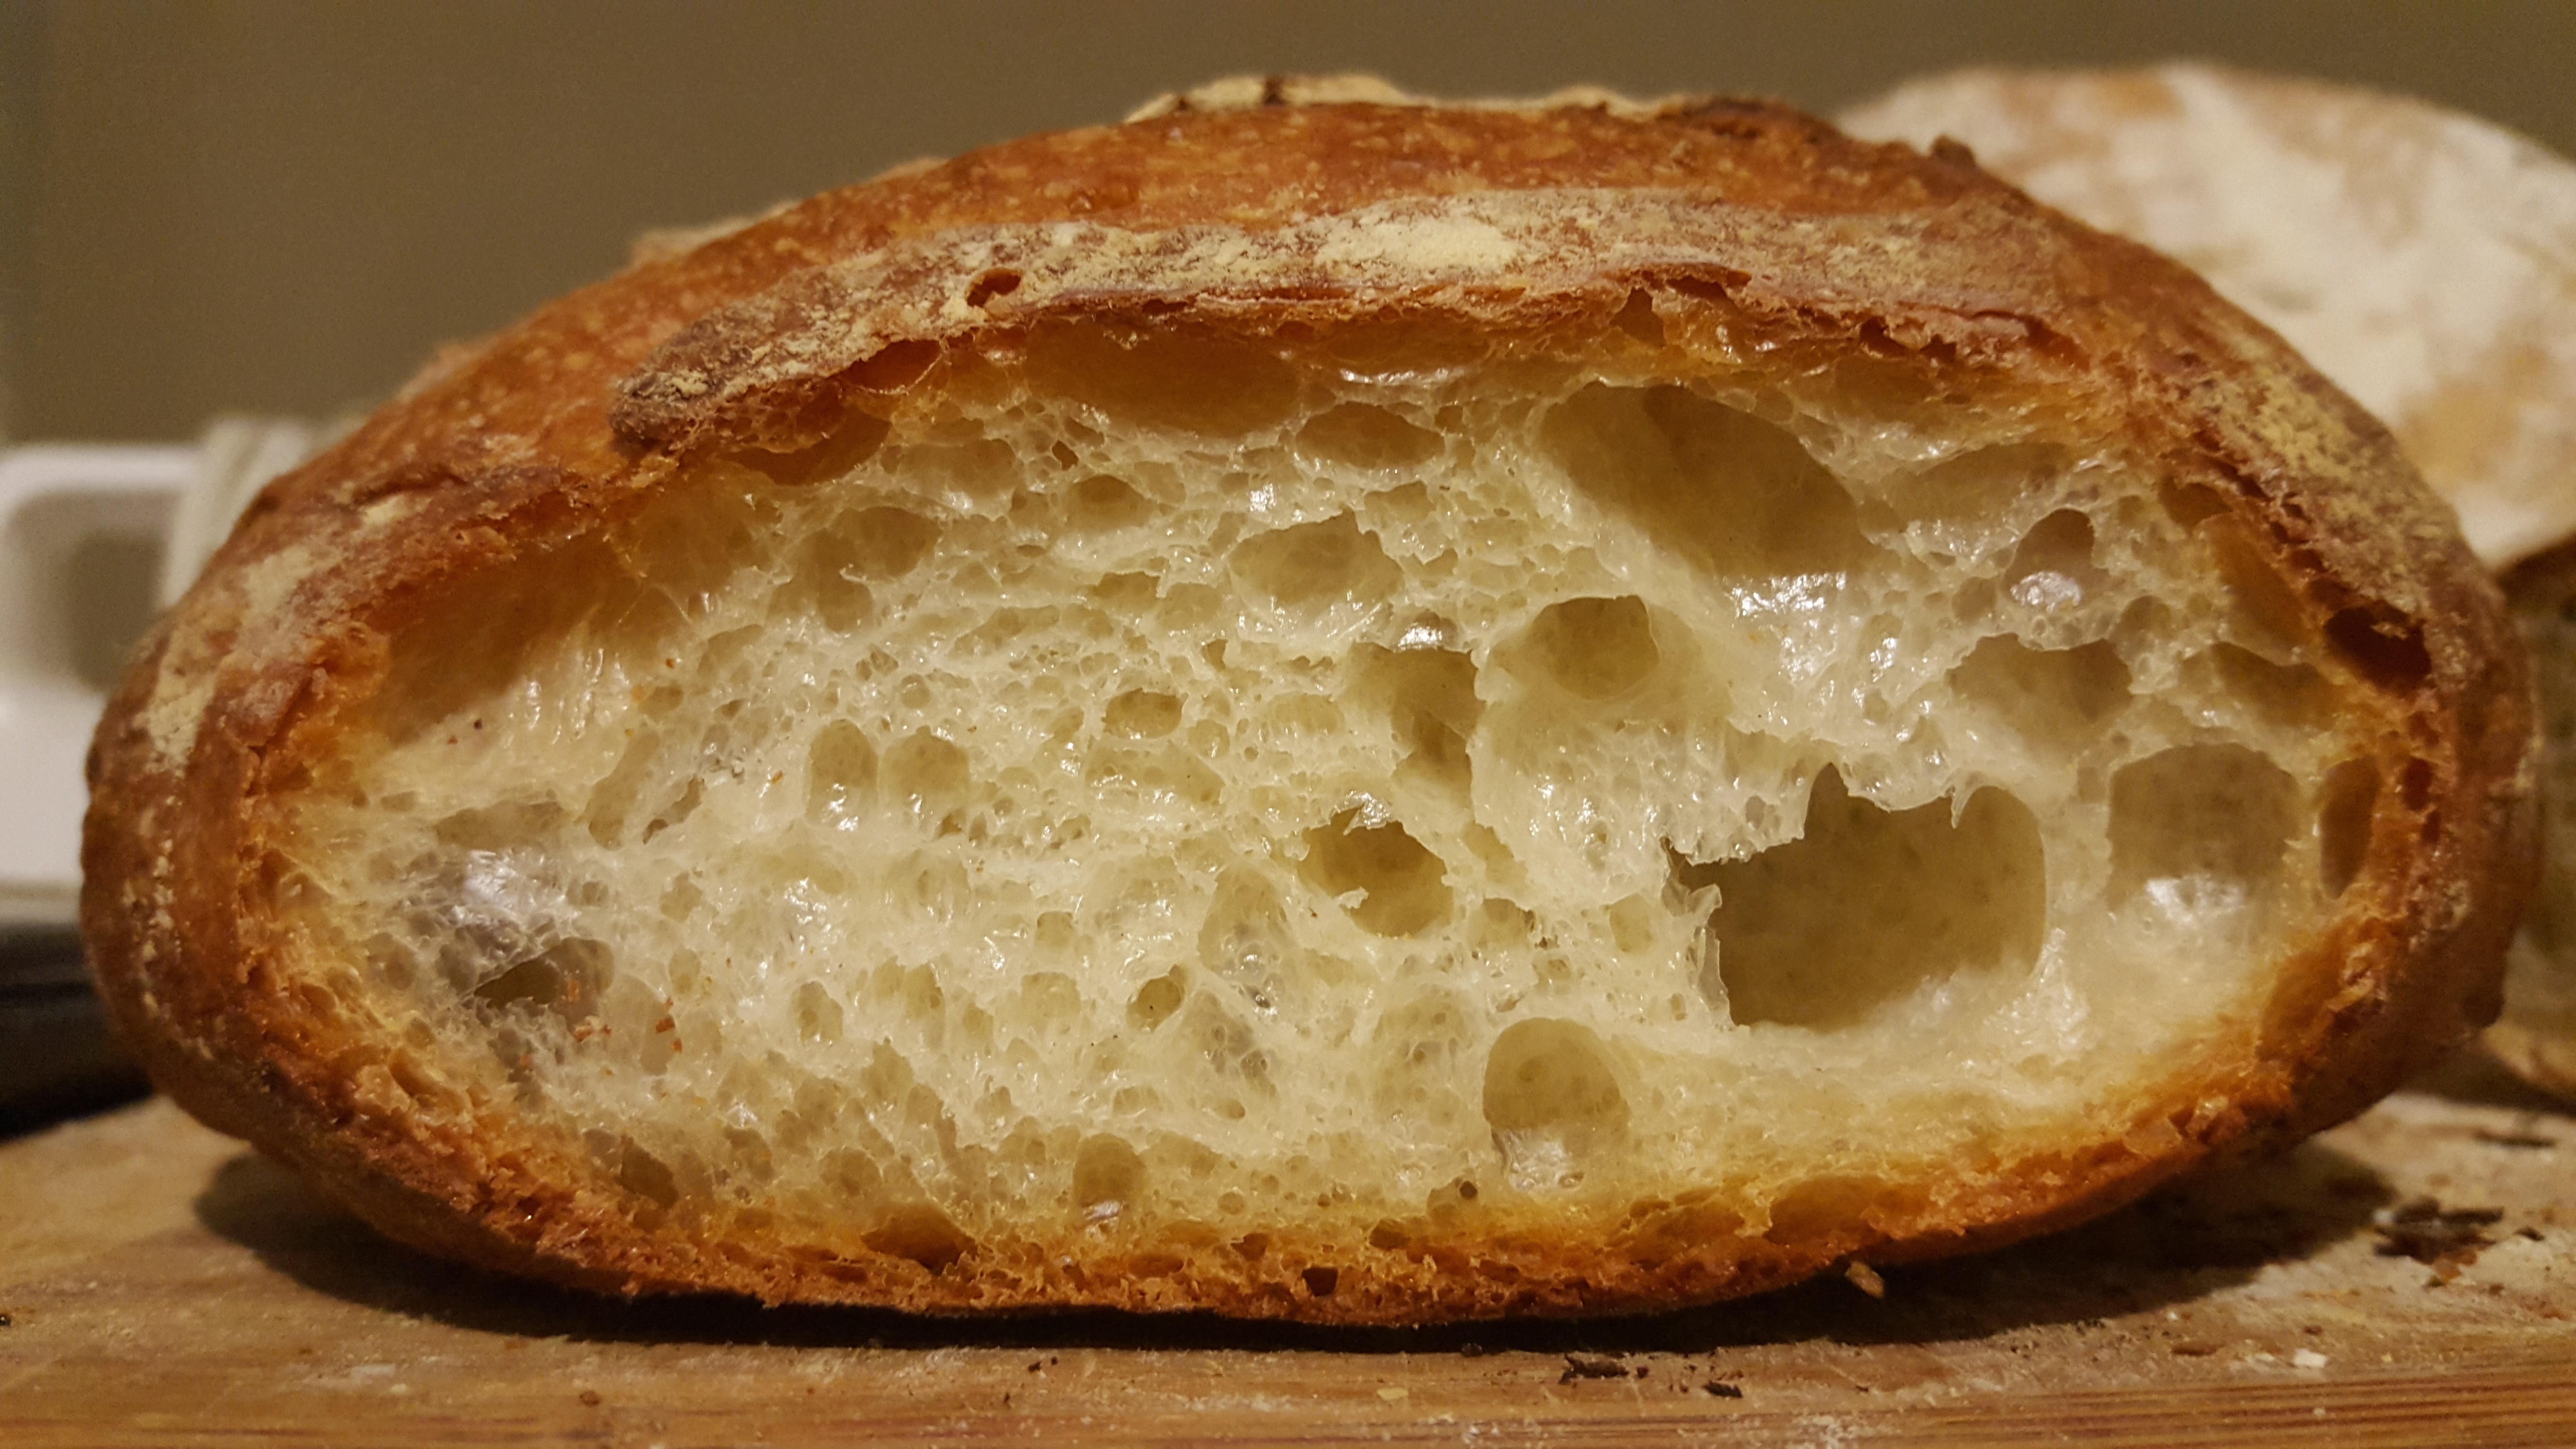
Crumb of 60% dough.
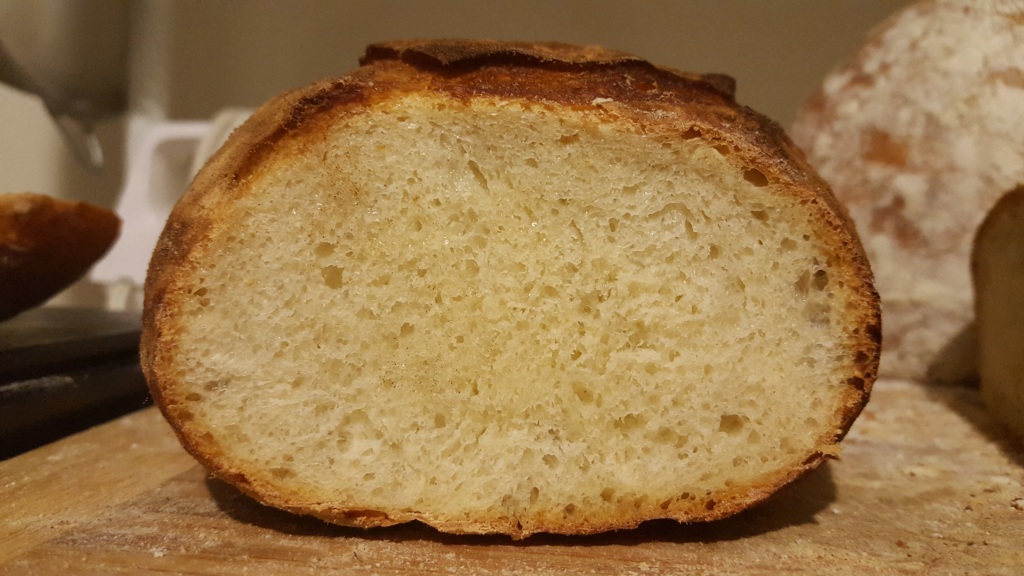
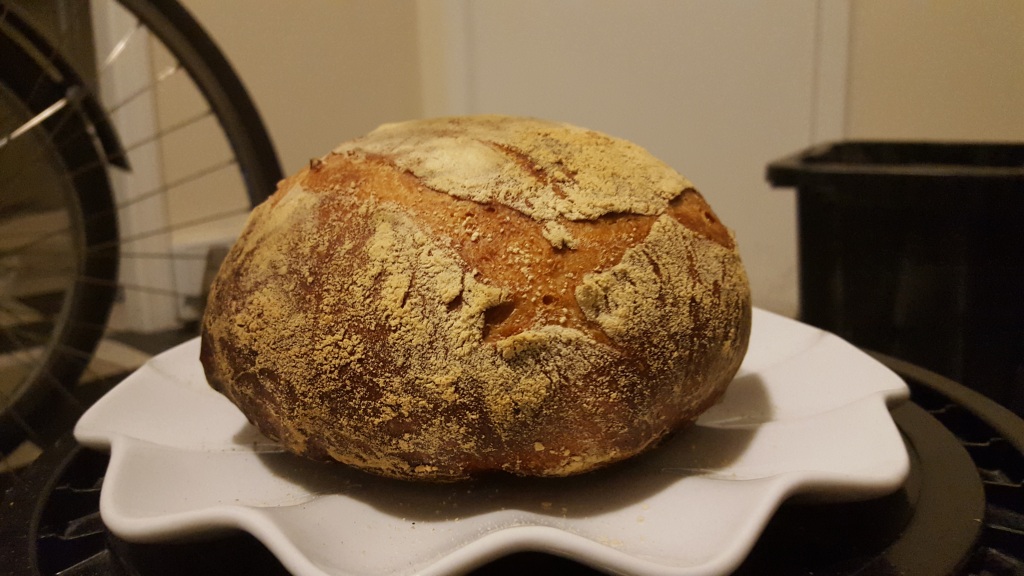
Crust of 70% dough.
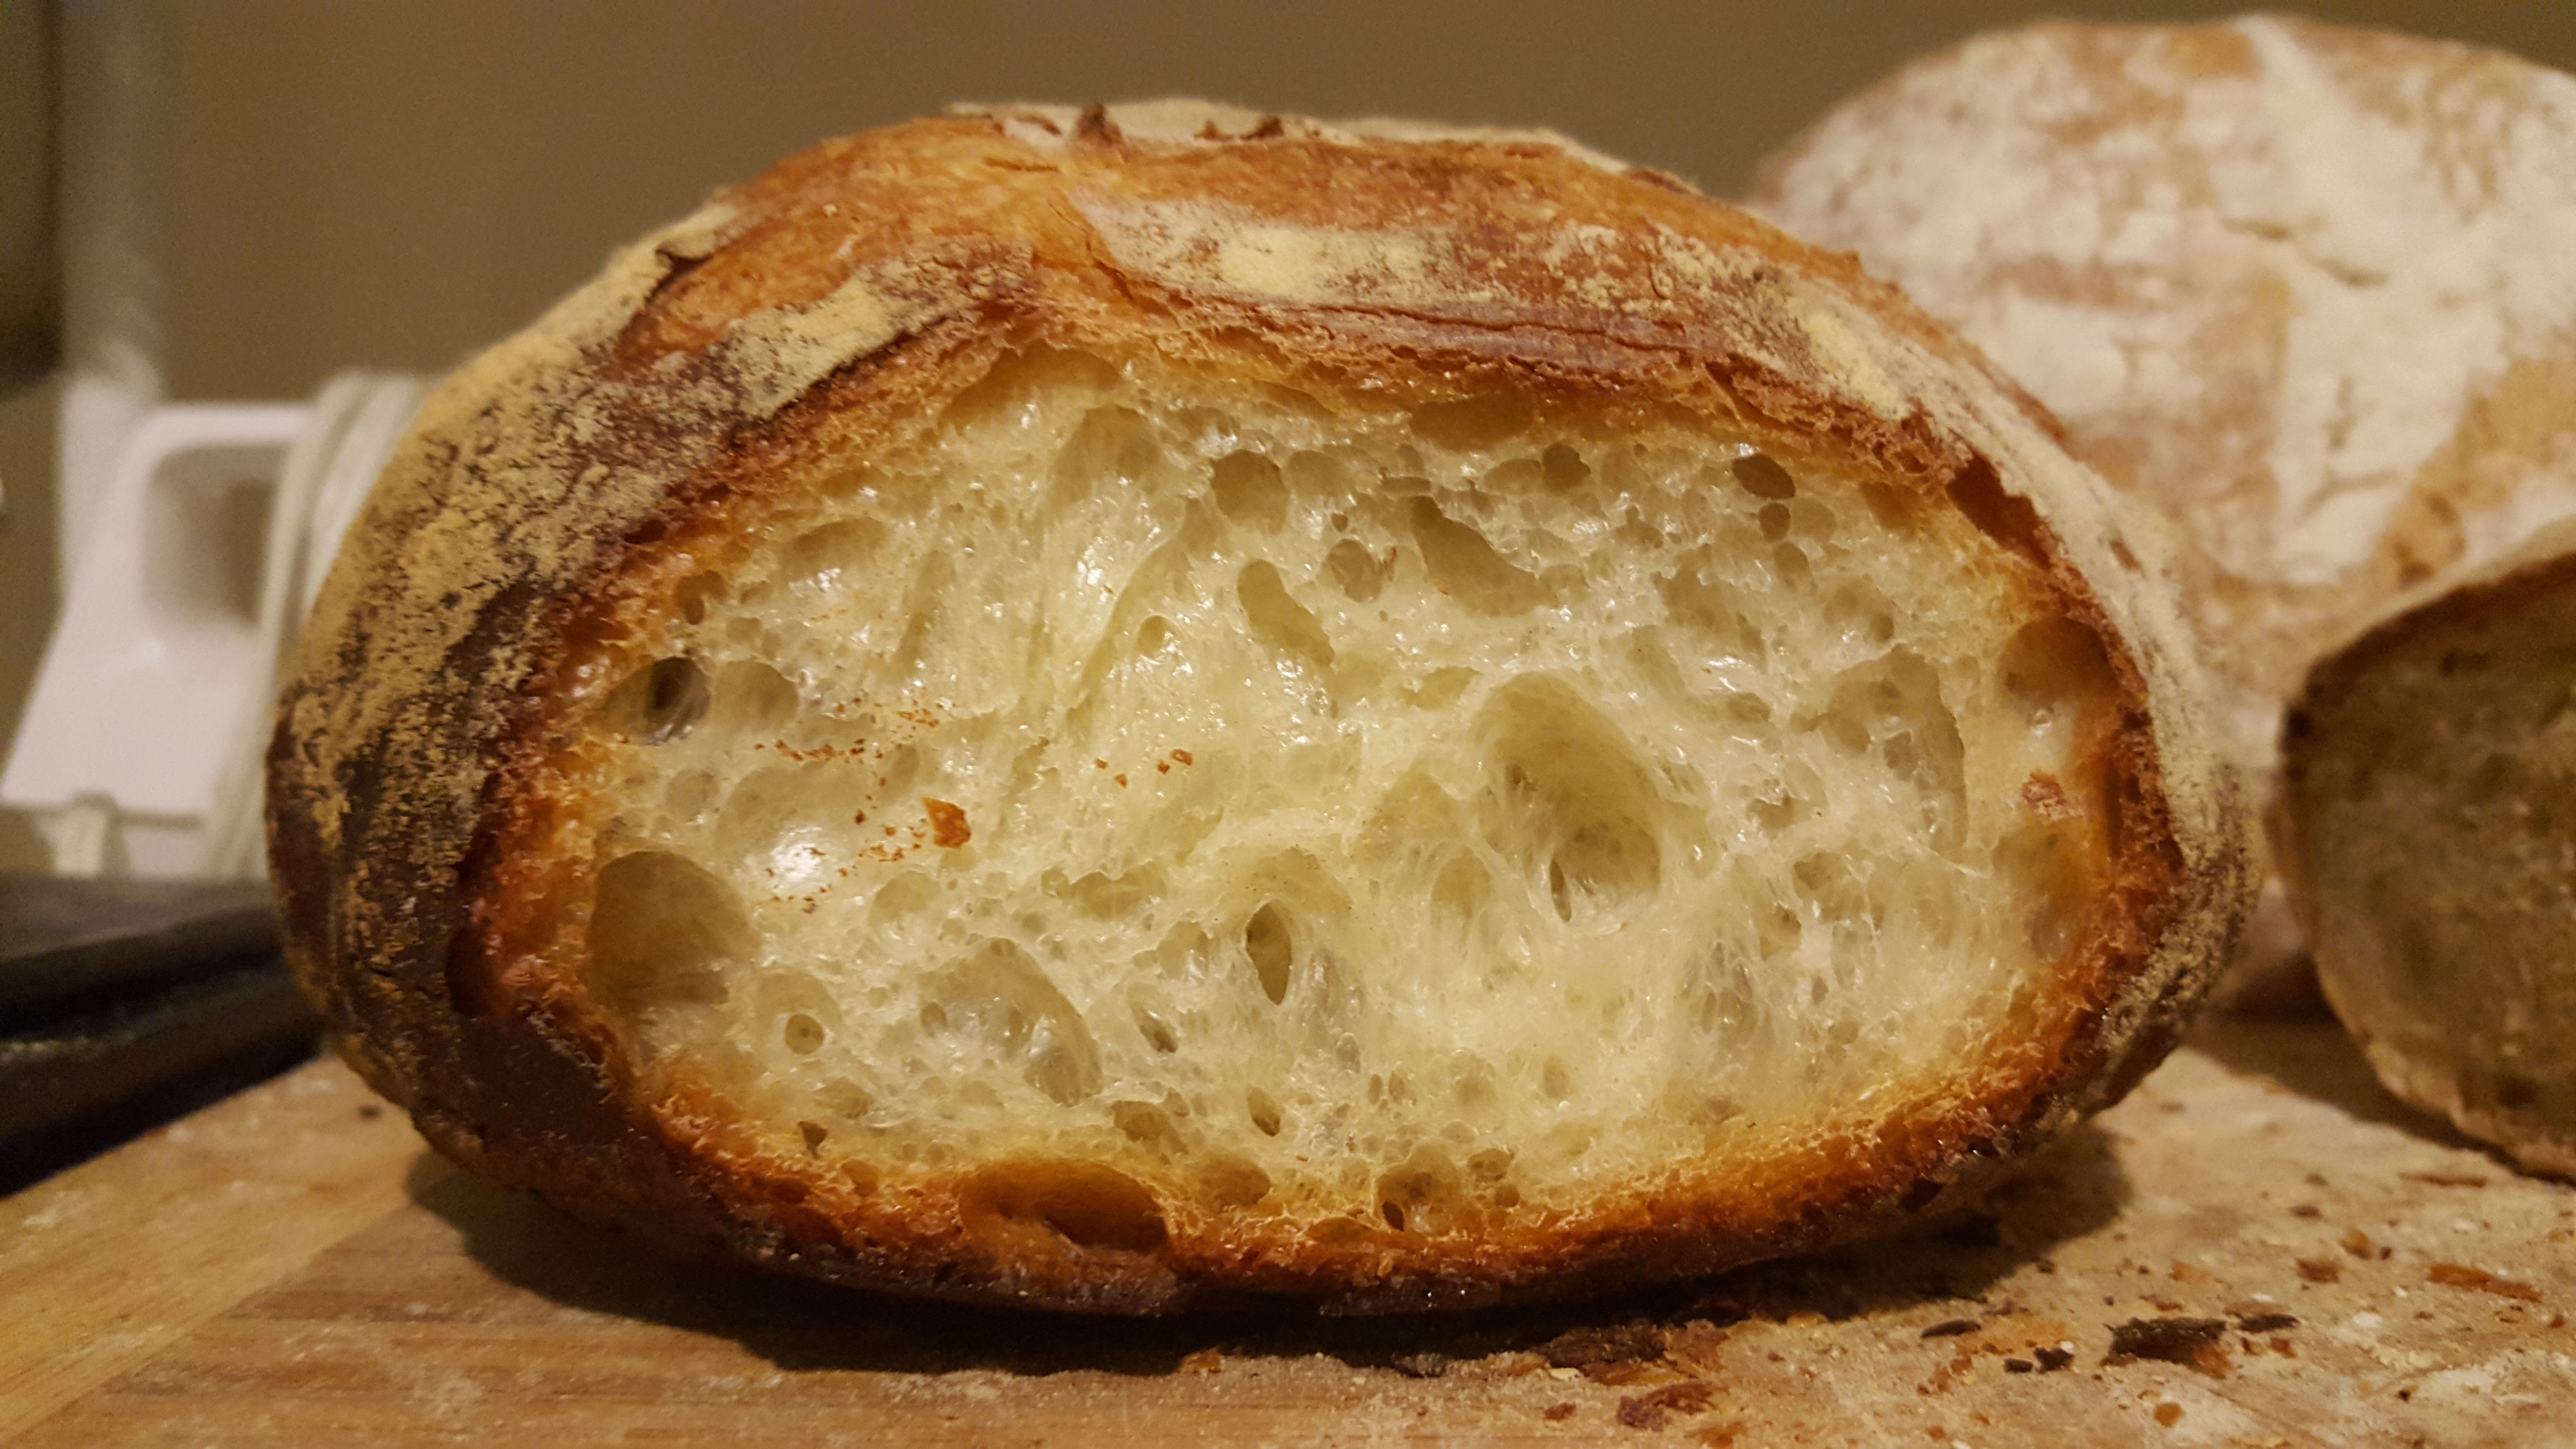
Crumb of 70% dough.
Crust of 80% dough.
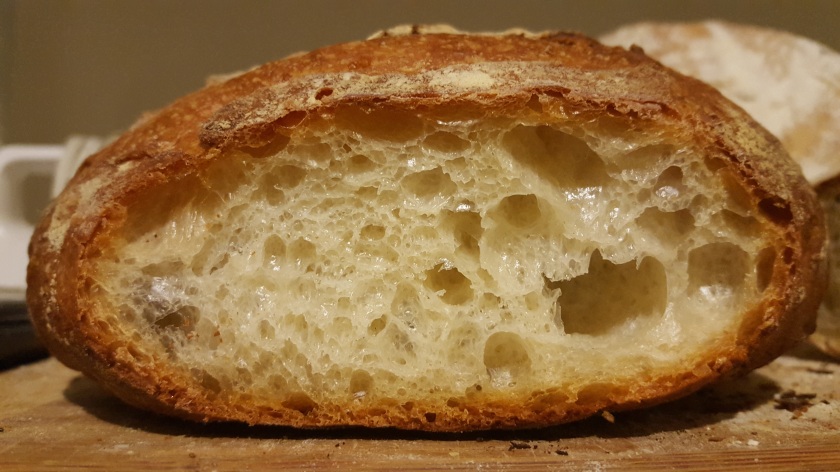
Crumb of 80% dough, complete with actual crumbs.
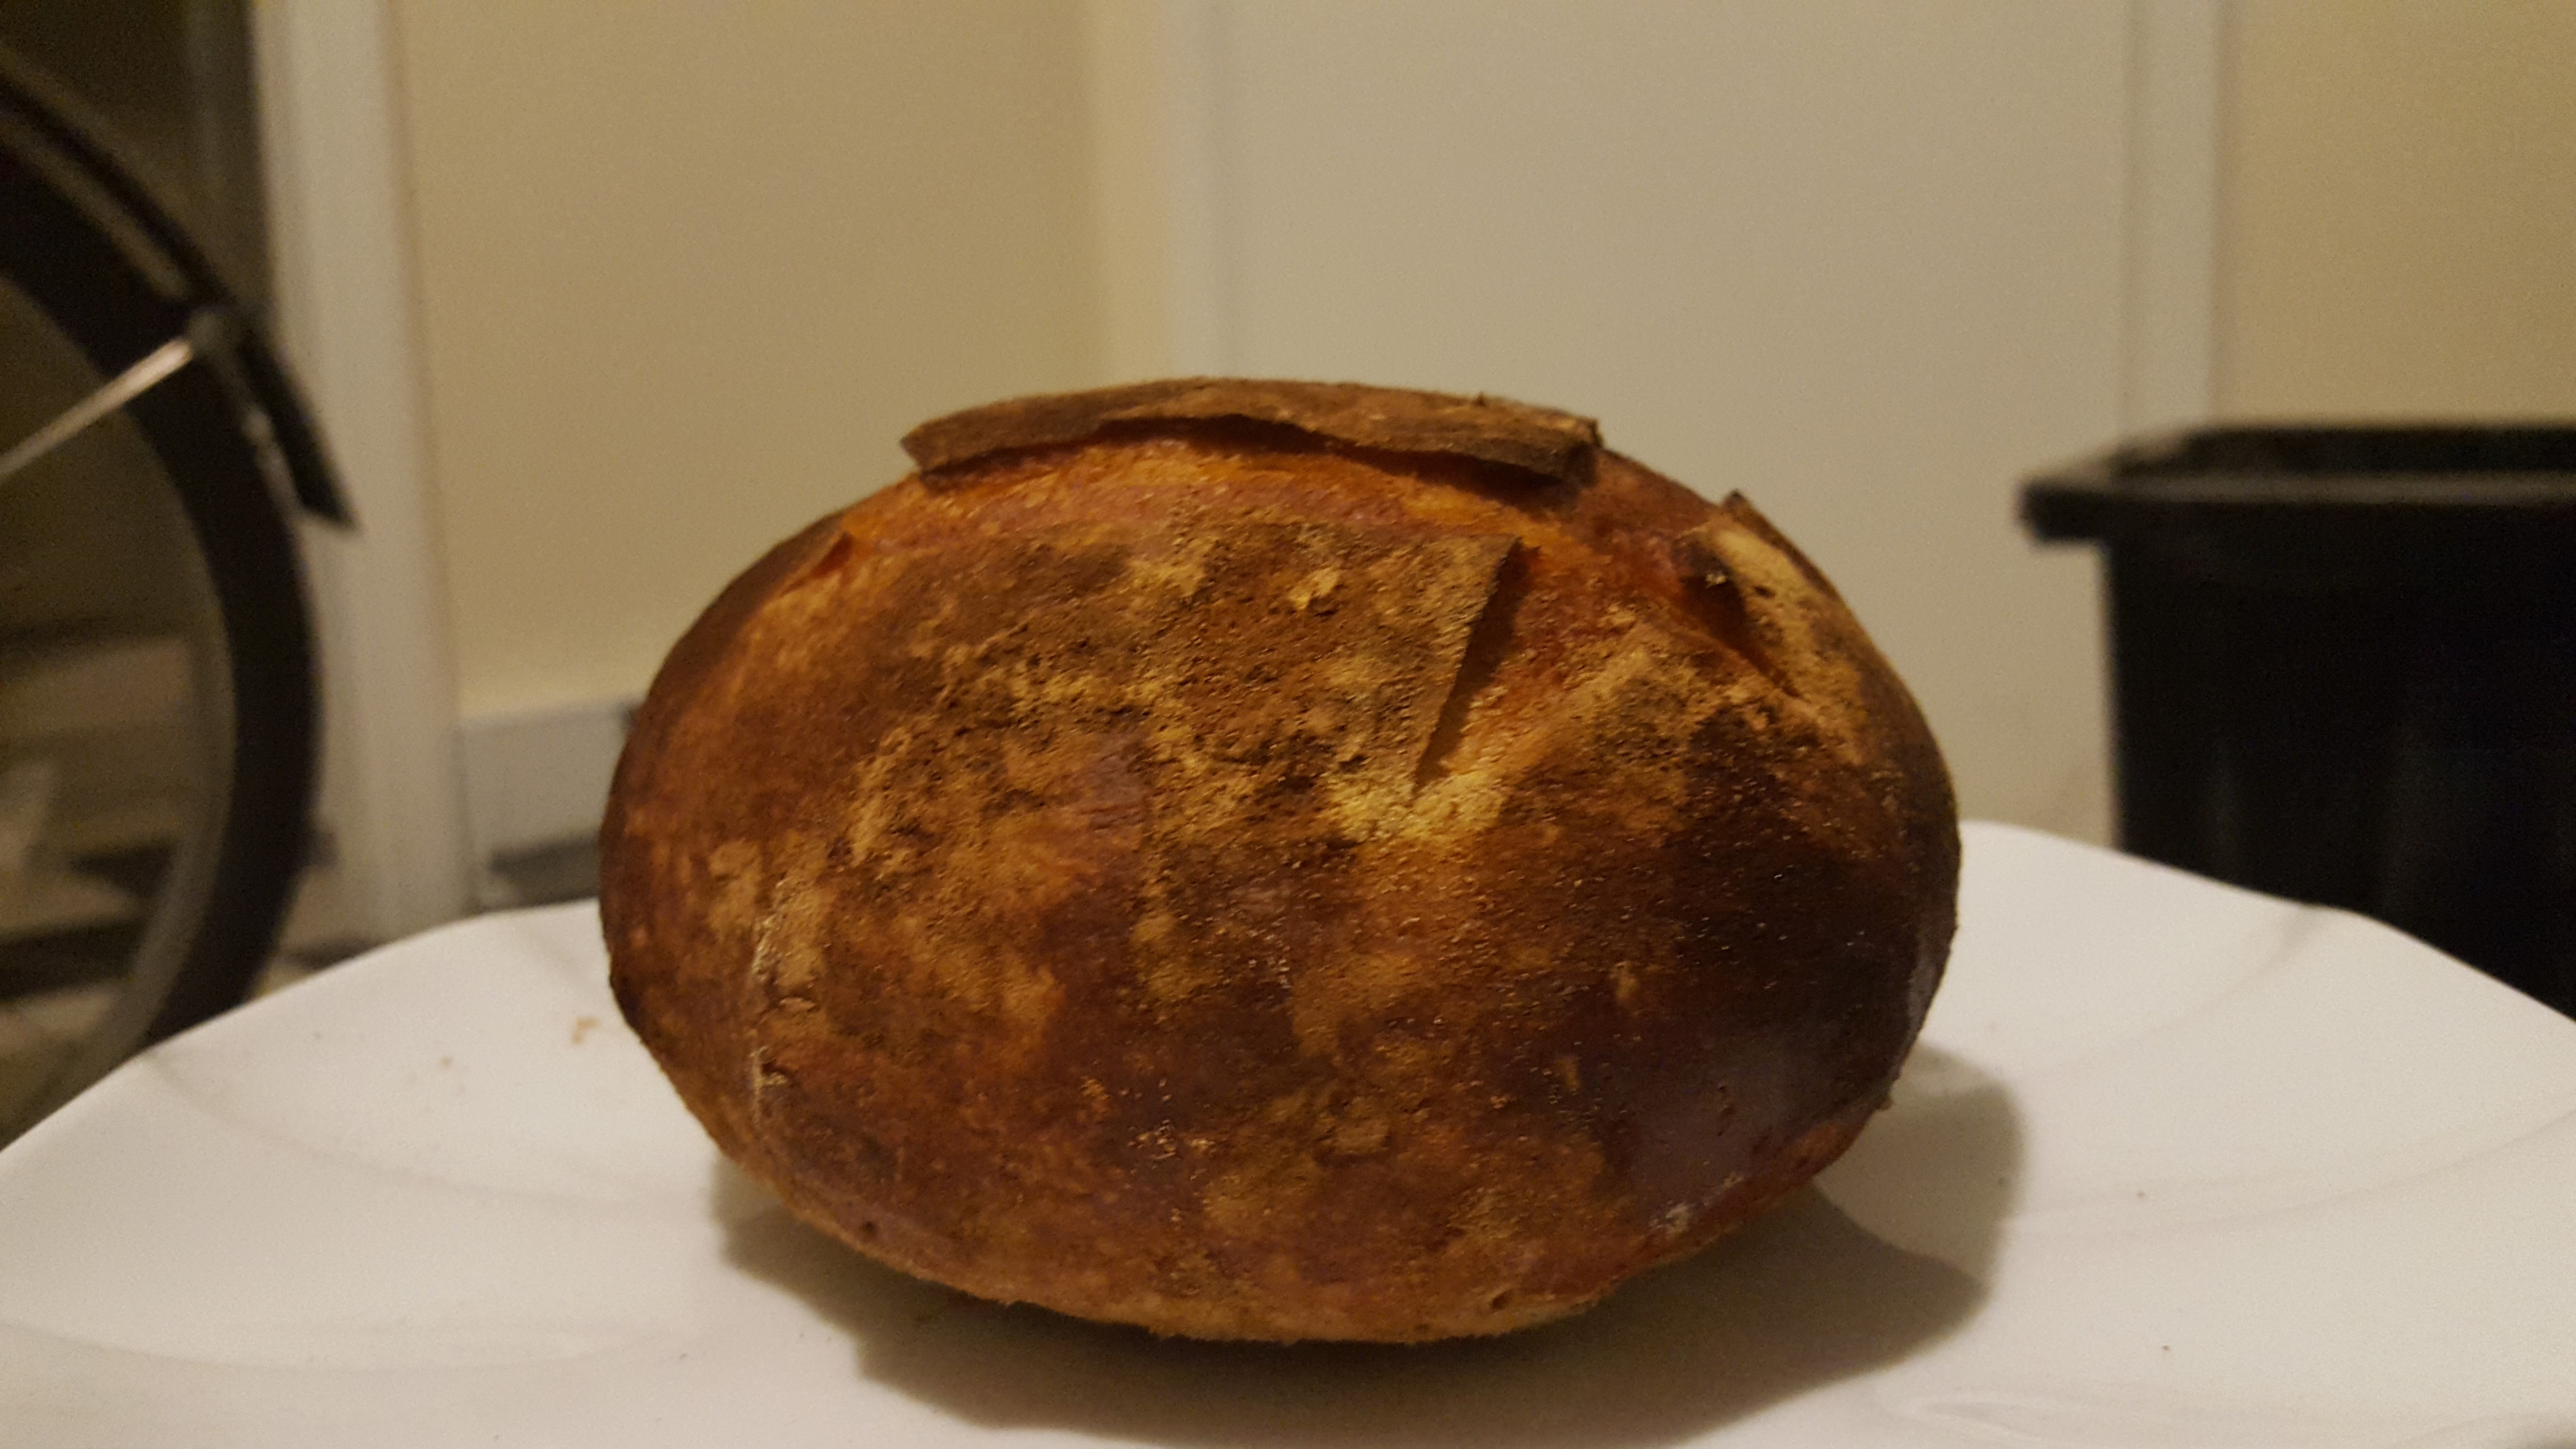
Crust of 90% dough.
Crumb of 90% dough.
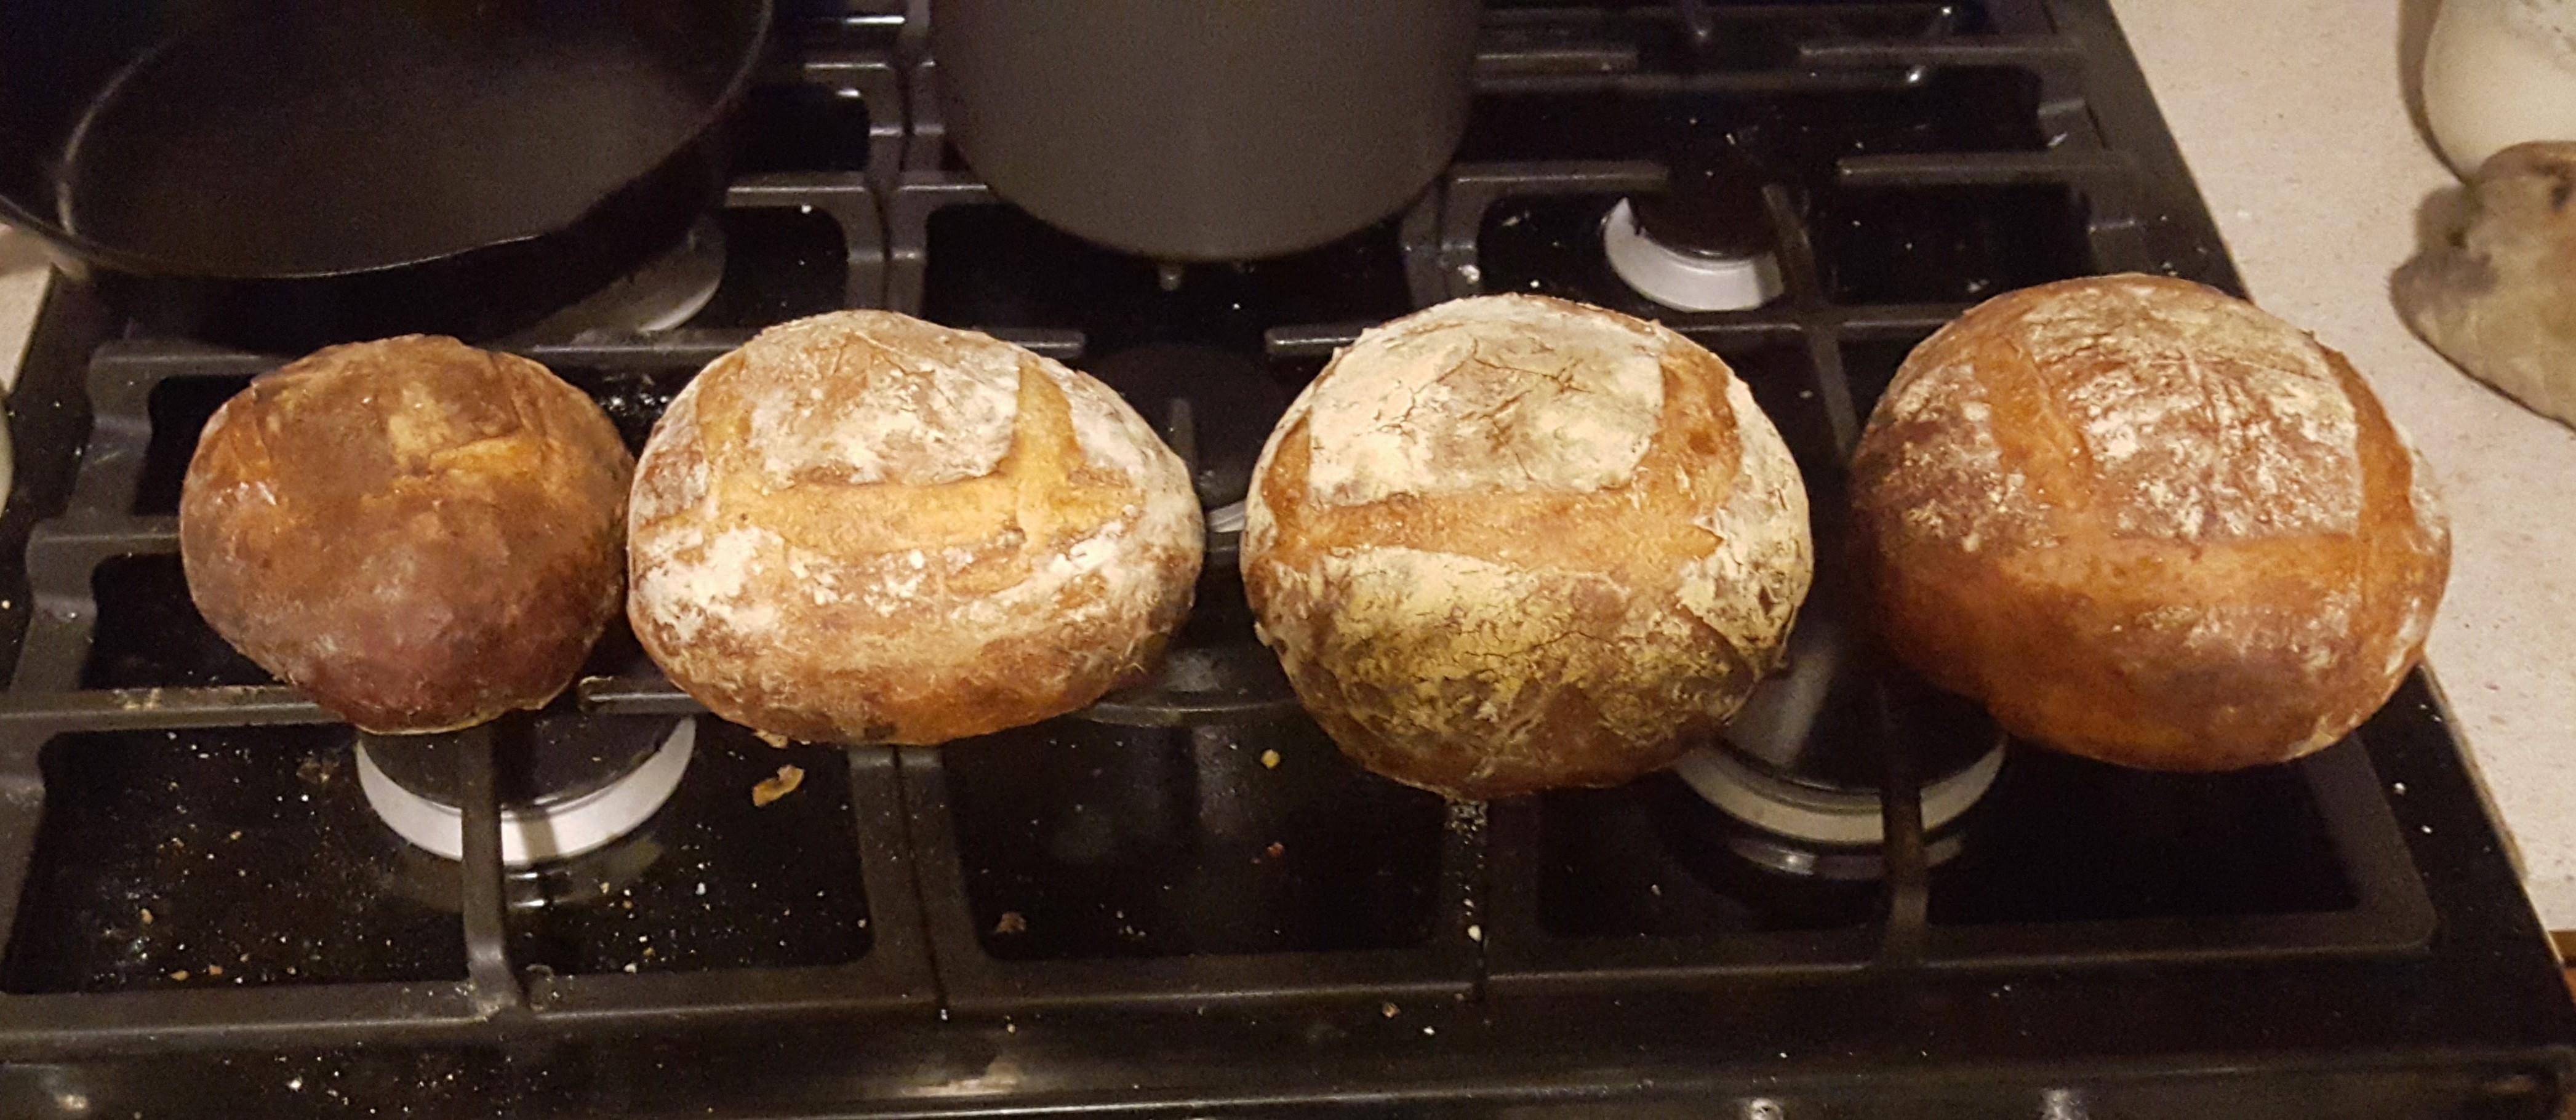
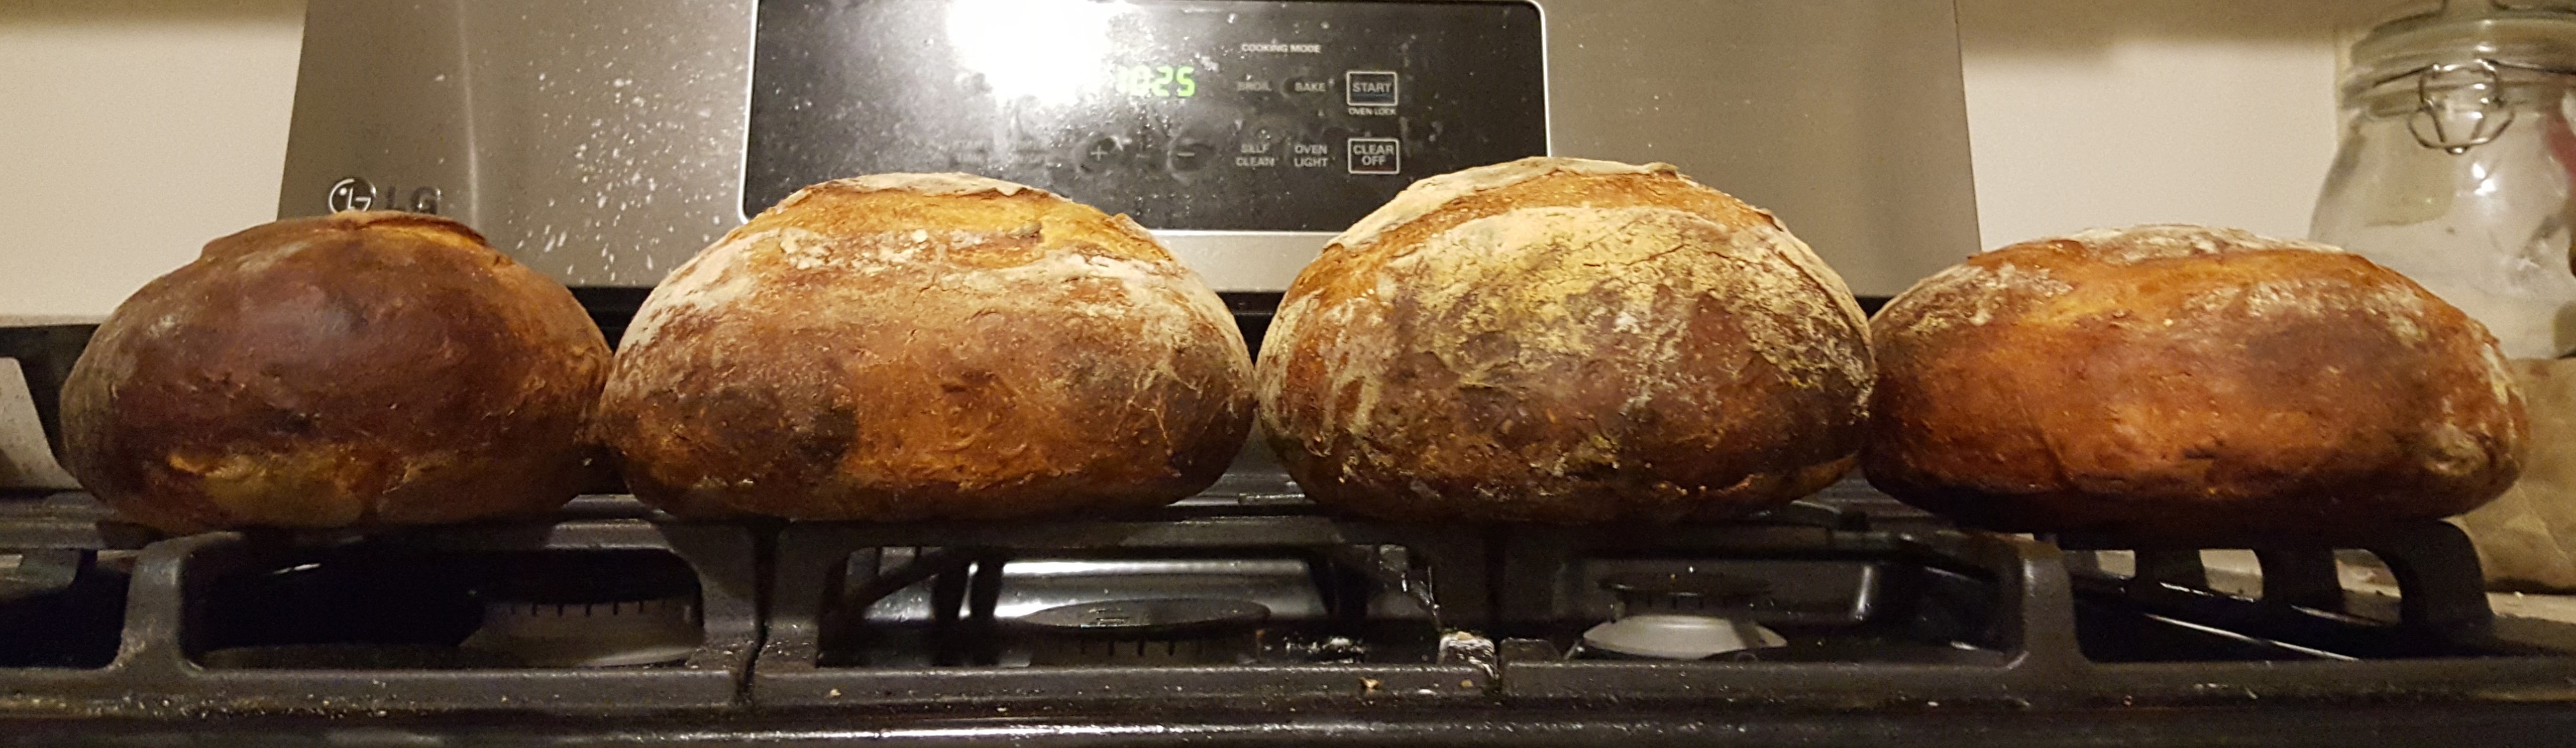
Figure 4 shows the relative size of the loaves in ascending order of hydration. Figure 5 gives a bar chart of hydration level by loaf height. As predicted, higher hydration correlated with larger loaves containing larger holes and thus softer crumbs. The hole size did not reach levels found by others with high hydration doughs, which may be due to such factors as fermentation duration and expertise in the techniques of stretch-and-fold, shaping, and scoring.
Figure 4. Effect of hydration level on loaf size.
Figure 5. Barchart showing the height of loaves as hydration increases.
Additional differences are observed among the loaves. The 60% bread browned much faster than the others, and its crust failed to develop shine and crackle. This is likely due to the fact that the tagine cooking method, a local variant of the well-known Dutch oven cooking method, relies on the bread’s own steam being released inside the cooking vessel. The low hydration dough would have released less steam than the others, failing to regulate the temperature inside the vessel, so that browning was possible even while it was covered. The lack of steam failed to make the crust glossy, an effect of starch gelating in the presence of water. However, there was still too much moisture to allow the crust to fully dehydrate, so it did not get crisp or make the characteristic crackling noises upon cooling that signal a superior crust.
Grigne width increased as hydration increased, while ear height (never especially high) decreased. Loaf height increased and then decreased as hydration level increased. However, we found that a confound was introduced during experimentation. Doughs were mixed in ascending order of hydration, and despite being spaced out in time to some degree, they were often ready to be baked before their predecessor had left the oven. Meanwhile, the room was heating up, accelerating the rate of yeast activity and thus proofing. The last loaf was therefore likely overproofed. Its reddish crust corroborates this, a sign that much of its starch had been converted to sugar, which is used in a browning reaction. This overproofing would contribute to a lack of height and ear development, so we cannot conclude that its hydration level is to blame.
Discussion
The crust of the 60% dough suggests that for lower hydration doughs, an additional source of steam is needed. Its crumb, however, was excellent for a dense bread, indicating that the difficulty of developing the gluten was not a barrier to good bread. This surprised us, as we were completely ready to sacrifice the 60% dough to the compost bin gods.
Nor was the high hydration level of the 80% and 90% doughs a barrier to working with them, contra some accounts in the literature. Higher protein flours, like King Arthur Bread Flour, absorb more water than lower protein flours such as all-purpose flour, so reports that 90% hydration dough is a pain in the ass may be due to poor flour choice. The 80% dough in particular was reported to be “a fucking delight” by one lab technician, who is also the PI and sole author.
The primary contribution of this work is to show concretely the textures of both dough and final product that can be expected at these landmarks in hydration space when working with King Arthur Bread Flour. However, these findings are not comprehensive, as these doughs were subject to short fermentation times relative to current trends in artisan baking, and were executed by an experimenter who has not actually read the books on which this recipe was based. Regardless, the predicted trends were supported by the data: higher hydration appears to cause greater oven spring and more open crumb structure.
Conclusions
We conclude that 80% hydration is an excellent ballpark for those desiring oven spring and open structure in breads made with King Arthur Bread Flour. We cannot generalize from these findings to other flours, as their different protein and ash contents would make the hydration levels map onto different outcomes.
Additional research is needed to further improve oven spring. We suspect that a large factor is the difficulty of scoring soft doughs, but additional factors are of great interest. Similarly, a followup study on proofing levels of high hydration doughs (see https://forums.egullet.org/topic/82234-demo-proving-bread/) would be useful to determine what heights the 90% dough is actually capable of.
Appendix: Importance of Lid
In a pilot study, we found that when the lid of the cooking vessel is removed from the oven during the uncovered phase of baking, it cools down, raising the concern that it might crack if replaced into a 500 degree oven for the next loaf. Thus, the second loaf was baked uncovered. As both loaves were from the same batch (of a different recipe than that given here), this provided a controlled study of the effect of covering the dough while baking it. The results were quite pronounced, as shown in Figure 6. Not only oven spring, but also crust texture and color, were affected. Note that flour coverage varies due to unrelated factors. Covered initial baking was found to be a far superior method for wet doughs.
Figure 6. Left, bread baked covered for the first half of baking. Right, bread baked uncovered for the entire duration of baking.
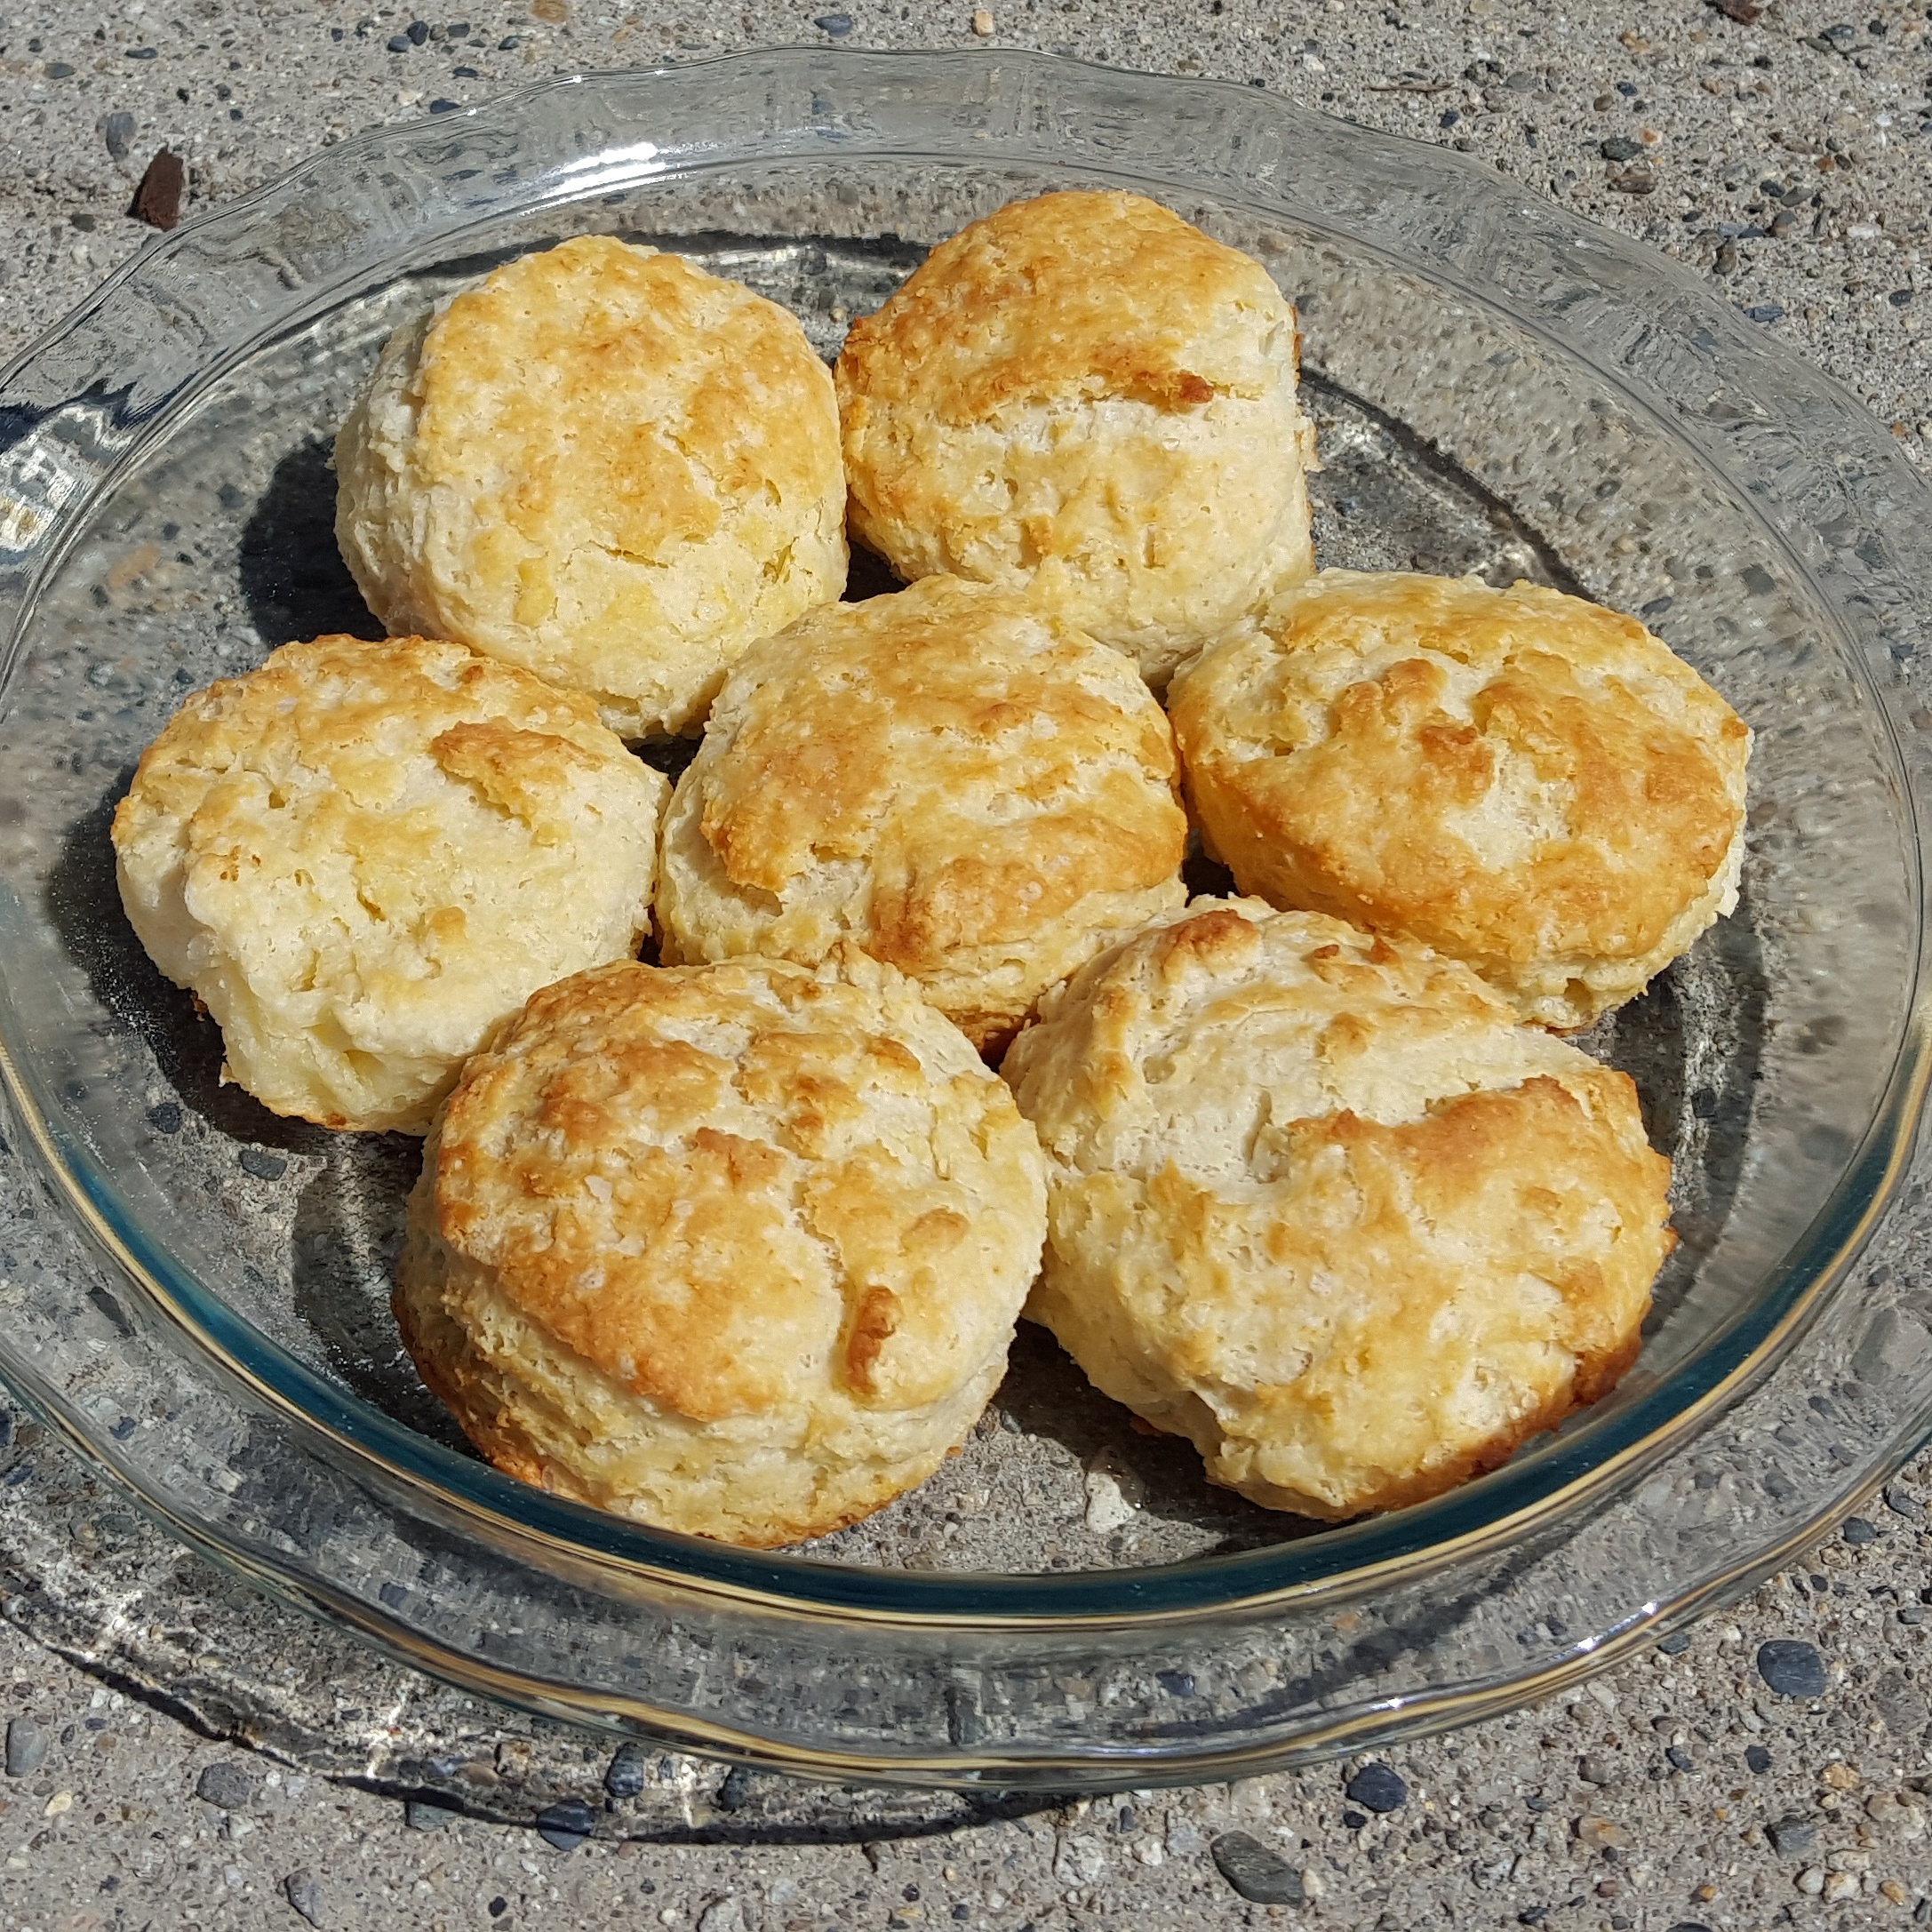
Biscuits are an amazing food with as few as three ingredients, and damn near impossible to get right. They’re supposed to be tender and flaky, which Alton Brown fans will recall are two characteristics at odds with each other. Flakiness requires working the dough, which develops gluten, which reduces tenderness. One approach that I’ve used here is to reduce the gluten content of the flour. This is why White Lily, a naturally lower gluten flour, is so popular for biscuits. I decided instead to sub out 2 Tbsp of my King Arthur all-purpose flour with cornstarch, which is gluten-free.
I had good results with the following recipe, which takes a pretty extreme stance (for biscuits) on folding – creating, in theory, 729 (3^6) layers. In reality, I don’t develop enough gluten before beginning the folding, or flatten out the butter pockets enough, to keep most of these layers distinct. I want to test this recipe with different shaping techniques to see how I really feel about folding and flakiness in biscuits.
My current stance is that tender and flaky isn’t the best way to think of biscuits. The real goal, I think, is fluffy and buttery. Fluffiness comes from enough gluten development to avoid crumbliness but not enough to be tough (this folding technique seemed to be a good amount), enough liquid and a short enough bake time to avoid dryness (the dough can be fairly wet without being unworkable), and enough leavening to provide lift. For leavening, I use baking powder only. That way, I don’t have to worry about whether there’s enough acid for a given amount of baking soda to react with, I get lift during the initial mixing but also in the oven because baking powder is double-acting, and I don’t use my precious buttermilk’s acid on leavening when I want it for tenderness and flavor.
Butteriness is pretty simple – use a lot of butter! And splurge a little on your butter. I got a fancier brand than usual and I think it paid off. Finally, don’t mix the butter in completely. Pockets of butter add flavor and vary the texture.
With fluffiness and butteriness in mind, I referenced Southern Living’s recipe and The Food Lab’s recipe and also took some liberties. I quickly checked the first few sources on baking them in cast iron to get a sense of the temperature; I saw a wide range of temperatures and chose 450F – on the high side to help them brown before they have time to dry out. Here’s what I did, for my best biscuits to date:
265g all-purpose flour (a little over 2 cups, but volumetric measurements of flour are really ambiguous)
15g corn starch (about 2 Tbsp)
1/2 tsp kosher salt
1 Tbsp baking powder
1 stick salted butter (1/2 cup, 113g), cold
1 cup buttermilk
Put a cast iron pan in the oven.
Preheat oven to 450 Fahrenheit/230 Celsius.
Mix dry ingredients in a bowl.
Cut butter into chunks.
Mix butter into dry ingredients. I use my fingers, but you can also use a fork, knives, or a pastry blender. The goals are to coat some of the flour in butter to reduce the amount of gluten development, and to reduce the size of the butter chunks without letting them melt or mix in completely so that they contribute to flakiness and interesting texture. I aim for a crumbly end result with no leftover pure flour and chunks around the size of M&Ms.
Chill the dough for 10 minutes in the fridge. I’m not convinced this is necessary in my climate but for once I decided to just follow directions.
Add the buttermilk. Stir it in just enough; the dough should be wet and lumpy but hold together.
On a lightly floured surface, gently pat the dough into a rectangle about 3/4 inch thick and trifold like a letter, left side in then right side in. Then trifold again in the other direction, the top third down and then the bottom third up. Turn over, pat out into a rectangle of the same thickness and repeat. Finally, do it a third time. It will get a little harder to do each time as the gluten develops. If it gets too hard, just stop.
Pat the dough to about 3/4 inch tall and cut out as many biscuits as you can fit. Use a plain round biscuit cutter, not a glass, and cut straight down, not twisting. The idea is that you don’t want to seal the edges together and keep the biscuit from rising. Gather the scraps, pat them again with as little working as possible, and keep cutting biscuits until you run out of dough.
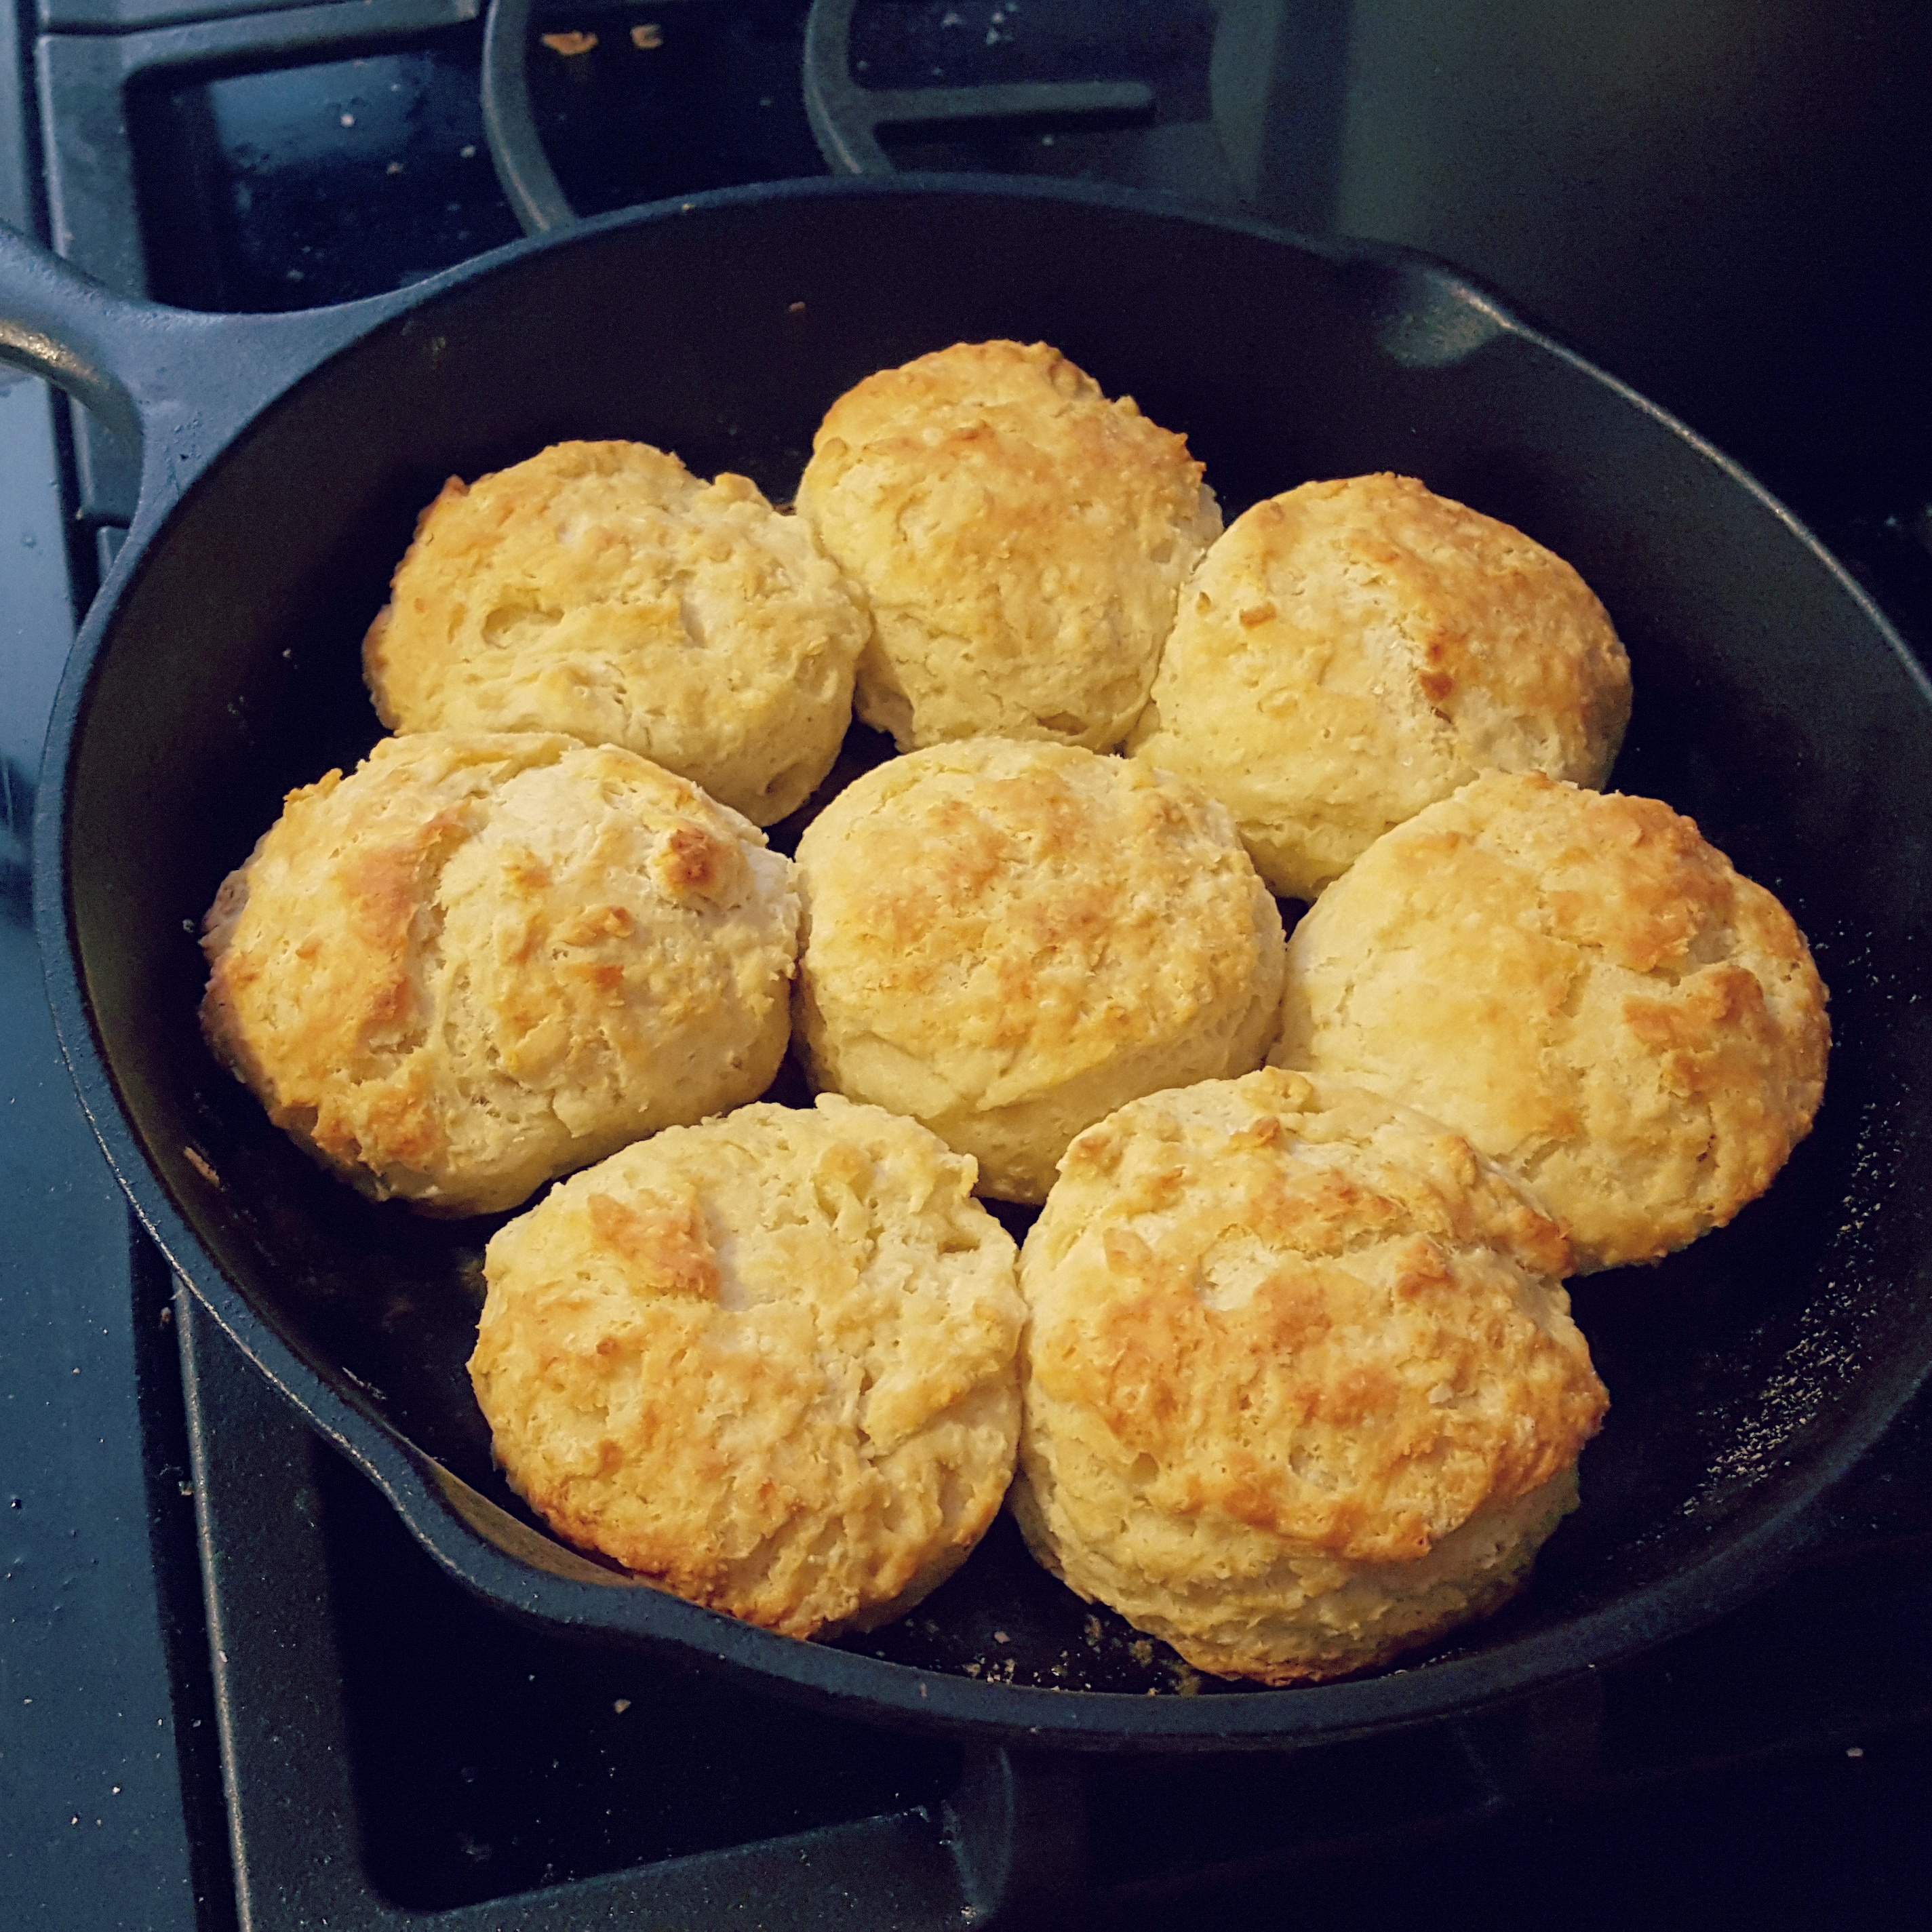
Carefully take the cast iron pan out of the oven, sprinkle flour in the bottom if it’s not super nonstick, and put the biscuits in it. I figure that if there’s enough space that you can choose to smush them against themselves or the sides of the pan, you should choose themselves; my reasoning is that dough against dough won’t form a crust and so it will be able to keep rising for longer.
Bake at 450F/230C for about 15 minutes. You’re looking for lightly browned tops (lacking sugar, they won’t get super brown) and for the quantitatively inclined, a center temperature of 210F/99C.
Carefully remove the cast iron pan from the oven and carefully remove the biscuits from it and definitely don’t forget that the cast iron pan is hot and grab it barehanded like I definitely didn’t do. Put the biscuits on a cooling rack.
Serve warm and enjoy!
I want to compare shaping methods to see how they affect the biscuits. This recipe includes more folds than many do. Does it make a difference? A way to make the layers really come through in the final product would be to flatten the dough with a rolling pin instead of patting by hand – this would increase gluten development as well as flakiness. Is that a good thing? If the layers are really great but the toughness is a problem, more cornstarch could help. I’ve also thought about shaving bits of butter onto a layer before folding it, like a lite version of croissant lamination. That should increase layering without increasing toughness.
Another idea I might try is adding sour cream or subbing some in for part of the buttermilk. It seems like the fat and acid in sour cream is magic for baked goods.
It’s important to dress for the occasion when you make Liege waffles.
Years ago I started making Liege waffles and blogged about it. I’ve made that recipe several times, and it’s always gone well, but recently I wanted to make Liege waffles and I didn’t have time to start the dough the night before. So I tried keeping the ingredients the same but changing the method.
I also multiplied the recipe by 7 because I was serving them at a party. That didn’t pose any problems, but it did require me to divide the dough into two large mixing bowls. It would’ve been smarter for me to make it in two separate bowls from the beginning, rather than guessing on how to halve it in the middle of adding ingredients. I ended up with 38 waffles.
Another change I’ve made since my first couple times making these waffles is that I ran out of imported pearl sugar and switched to bashing sugar cubes in a ziploc bag with the end of the handle of my chef’s knife. They still caramelize, so it seems like a fine compromise to me. This post suggests making pearl sugar by mixing sugar with maple syrup and letting it dry. I don’t know how real pearl sugar is made but that doesn’t sound like a bad idea at all since we know maple syrup tastes great with waffles.
Ok, so the quicker method:
1. Wake up your yeast.
Mix water, milk, yeast, egg, and half the flour in a bowl. Let sit for a few minutes.
2. Let the flour absorb the water.
Add the rest of the flour, mix well. Let sit for 20 minutes.
3. Make gluten.
Knead until the dough is elastic.
4. Add all remaining ingredients except pearl sugar (or sugar cube pieces).
This is where you put in the salt, which makes kneading difficult, as well as the brown sugar, honey, and butter, which make gluten formation difficult. It’s also when you add the vanilla extract, but I don’t think it really matters when you do that.
Getting the butter incorporated is hard if you’re mixing by hand. I recommend microwaving it until it’s melty but not liquid.
I got worried at this point, since I usually mix it in a machine but this time did it by hand, and the texture looked awful. But during the rise it rallied.
5. Let rise.
Let it sit for an hour.
6. Redistribute bubbles and yeast, divide into servings.
Punch it down, fold it a few times, and then shape it into a bunch of balls that are a bit smaller than each section of your waffle maker (because they’re going to rise).
7. Let rise.
Let it sit for another hour.
8. Cook.
Put them in your waffle maker. Mine does best on level 4 out of 5 for less time than my waffle maker thinks is necessary – I go by smell and intuition, and checking on them doesn’t really hurt.
No one knows how long Liege waffles keep for.
Cleaning your waffle maker is interesting after making Liege waffles. The trick is to let the caramel harden and then break it out with a fork. Then eat whatever caramel isn’t burnt as your prize for having to clean this thing.
Do you lose anything by speeding up the process? Possibly. I haven’t compared them side by side and these were perfectly delicious, but it is true that letting yeast work slowly at a cool temperature produces better flavors than having them work fast at room temperature. But I think there’s so much else going on in the flavor of a Liege waffle that it probably doesn’t matter.
For my second birthday party (yes, I had two birthday parties), I made this pie.
The crust is based on this recipe, made of only shredded coconut (which people brought to my first birthday party, making that really simple!) and butter. You could get away with less butter than is in the recipe. I don’t have any qualms with butter but I didn’t end up using all that was called for. Be careful about burning the edges – I covered them with foil and they still browned, so they turned out fine in the end but I wouldn’t want to push it.
The filling looks like it’s from the same recipe, but it’s not! That recipe has a ganache filling that you chill. Mine is my trusty recipe for flourless chocolate cake:
200g dark chocolate (I use 60-70%; two nice bars of chocolate is usually exactly the right amount)
200g eggs (4 eggs)
200g butter (1 stick, 6 tablespoons, and a little smidge more)
200g sugar (1 cup sugar)
You just melt the chocolate and butter together, and then mix in the eggs and sugar, making sure the mixture isn’t too hot for the eggs. If the chocolate separates, as it sometimes does, 1) don’t panic, 2) stir it over the heat until it comes back together, which it will.
Then bake at 350F for about 30 minutes.
It’s done when it doesn’t really jiggle, at 170F.
I can’t believe I hadn’t blogged that recipe yet. It’s easy to remember, easy to execute, and always makes friends.
So I blind baked the crust and then poured this inside – I didn’t have any problems with it leaking through the crust, just use enough coconut – and then baked again, still with foil around the edges.
It was a hit! I was kind of sad that there weren’t any leftovers.
I used this recipe to make a Christmas Eve dessert.
I adapted it slightly. I definitely poached my own pears. I’m not snobby about all ingredients, but the difference between fresh and canned pears is huge. I followed David Lebovitz’s recipe for that, and added ground cinnamon, ground nutmeg, and whole cloves (maybe a tablespoon of each? I didn’t measure) to the syrup, which I made double the amount of.
Double the pear poaching syrup might have been more than I needed, especially since you don’t actually need 4 pears to do this recipe. Only two quartered pears will fit on the top of my tart, although I squeezed in one more quarter.
I also don’t have baking beans or parchment paper handy, so I blind baked the crust without anything on top of it for 15 minutes and that seemed fine. It didn’t brown.
I haven’t tasted the finished product yet but I think the crust might turn out too floury tasting. It’s somewhere in between a cookie crust and a flaky buttery crust. You might want to try a pate sucree recipe instead. But I’ll report back after tonight. Edit: The crust was tender but a little too floury tasting for me. It wasn’t bad but I’d just as soon eat the filling and the pears without the crust. Making it either more buttery or sweeter would probably be better. The almond meal in the crust probably helped keep it tender but I don’t think it added much flavor-wise.
I also added some vanilla to the frangipane, and right now I’m boiling down the syrup I poached the pears in to make a sauce for the tart, especially important if it turns out to be not sweet enough. I also thought a caramel sauce would go well with it, but since I already have this syrup I’ll try that first. Edit: the frangipane was delicious. My sister doesn’t like pears so I just made her try a bite of the frangipane and she said “It’s like a little angel!” She then apologized for not being good at talking about food but I thought that was pretty great! I do think adding spices to it would be good, though. The syrup didn’t pack the punch I had hoped, but the tart didn’t really need it, either.
The whole thing took me two hours. I made the crust, let it rest while I prepped the pears, blind baked, poached, and made frangipane simultaneously, and now I’m baking and boiling down the syrup. You could do the crust ahead of time, of course.
One thing I learned from doing it is that you want to grab the pears out of the syrup either without piercing them, or piercing them from the bottom! When they dry up in the oven the fork marks really show!
Cinnamon and cloves are my obsession this winter since I tried a cocktail with Fernet Branco (but it didn’t taste bitter at all!). I’m thinking about using the syrup in a cocktail, too.
The Daring Baker’s October 2011 challenge was Povitica, hosted by Jenni of The Gingered Whisk. Povitica is a traditional Eastern European Dessert Bread that is as lovely to look at as it is to eat!
I finally got back to baking and made this, but I can’t post yet. Coming soon!
Anyone who’s into chocolate chip cookies knows about the NYT recipes from Jacques Torres. Some swear by it. Last night, I was struck with cookie inspiration and decided to finally try it. My overall impression is that it makes for great texture, meh flavor. Here’s what I’ve found out so far:
No need to be so fancy
Flour: It calls for, by weight, half bread flour and half cake flour. Depending on the flours you use (their contents vary by brand), I think this amounts to using all all-purpose flour. Perhaps Jacques had some good reason for writing the recipe this way, but until further notice, I’ll assume it was just to look fancy. I didn’t have enough bread or cake flour on hand (most of my bread flour is whole wheat because most of it goes to making, you know, bread), so I used all-purpose flour, and I was perfectly satisfied with the result.
Chocolate: I hope I don’t even have to tell you that you can use whatever bits of yumminess you want in these cookies. High quality chocolate tastes good, but I used regular old chocolate chips and they taste just as good as they always do.
Size: The NYT recipe wants you to make enormous cookies. Well, sure, cookies the size of my head can stay soft for a while, but I like my cookies normal size, and I want a recipe that produces well-textured normal size cookies. So I test mine with somewhere around a tablespoon of dough per cookie. The results are good: the success of the NYT recipe is not due to a size trick. It makes good normal size cookies, too.
Timing: The NYT recipe says to chill the cookie dough for 24-36 hours before baking. What a pain, I wanted cookies last night! So I decided to find out if it really matters. I baked one sheet of the cookies last night right after making up the dough – I stuck them in the fridge for 5 or 10 minutes just because the preheated oven was making the room hot and I wanted them to have a fair chance. Then I put one log of cookie dough in the fridge to be baked tonight, and another log (it makes a lot of cookies!) in the freezer for a rainy day (like yesterday, and today…). I will report on the results of a blind taste test soon. But already I can tell you, unchilled NYT cookies are plenty good. Not too flat or hard or crispy, pretty much just how I like them.
It succeeds in making a cookie that’s chewy, not crispy or cakey.
It uses a little more brown sugar than white sugar, as a chocolate chip cookies should, in my opinion. Brown sugar is brown because it has molasses in it, and molasses has water in it, so it’s a way of making your cookie a little softer.
I like to compare cookies to the Nestle Tollhouse recipe, which I’ve had memorized for I don’t know how many years. My Nestle cookies always come out too hard when cool, and kind of greasy. Here’s approximately how to make NYT cookies from a Nestle recipe (all comparisons are by weight):
Divide the amount of butter in half.
Divide the amount of egg in half.
Subtract one fourth the total amount of sugar.
It’s hard to tell that these are the differences between the two recipes, since they make different amounts. That’s why putting recipes in baker’s percentage is so handy. But the result is that the flour, leavening, salt, and vanilla play a bigger role in the NYT cookies.
Why less butter and egg: Cookies that are heavier on flour and lighter on butter stay soft better, but they run the risk of being too cakey and dry. In fact, I made some like this once and compared that recipe to the NYT recipe. It turns out that the only difference between the two was that the dry recipe used all white sugar instead of a mix of white and brown, and more egg. We know that brown sugar makes a cookie wetter and softer, and for reasons I don’t fully understand, eggs make them cakey, even though eggs are wet. So I guess in order to increase the relative amount of flour in the recipe without ending up too cakey, the NYT recipe had to decrease the amount of egg.
My one complaint is the flavor.
What I don’t know about is the sugar. Does it have to be decreased? The combination of less sugar and more salt seemed to trick my taste buds into thinking I was eating peanut butter cookies, which I’m sure is right up some people’s alley, but I’d rather have the regular old sweet flavor. So my next task will be to replicate this recipe but with more sugar and less salt. (In Jacques’ defense, I had to estimate the amount of salt, because I was using kosher instead of sea salt, which is less coarse.)
Jana of Cherry Tea Cakes was our July Daring Bakers’ host and she challenges us to make Fresh Frasiers inspired by recipes written by Elisabeth M. Prueitt and Chad Robertson in the beautiful cookbook Tartine.
Instead of the Daring Baker recipe, I used this recipe from Food Lover’s Odyssey. It uses genoise cake instead of chiffon, meaning the eggs aren’t separated but are heated and then beaten to make a foam, and it uses an ungodly amount of butter to make the cream stand up instead of gelatin.
I used half the amount of butter it calls for – the strawberries in the center of the middle layer did most of the work of holding the cake up. My boyfriend and I picked the strawberries ourselves! And the blueberries came from the same farm.
The cake shrunk as it cooked, naturally, so my springform pan had a little extra room when I used it as a mold for the center layer. The result was the strawberries hanging kind of low. If I had started with the cream it probably would’ve worked better.
Regardless, it was delicious! Decadent and summery at the same time. We ate it on the Fourth of July. I would definitely make it again, but probably in the structure of a regular cake just to make my life easier.
Erica of Erica’s Edibles was our host for the Daring Baker’s June challenge. Erica challenged us to be truly DARING by making homemade phyllo dough and then to use that homemade dough to make Baklava.
I was a little daunted by the idea of making my own phyllo dough. Even Alton Brown doesn’t make his own phyllo dough when he makes baklava. I have now made something more from scratch than Alton Brown. But I did decide to compromise. I made the bottom layer myself and used store bought dough for the rest. I also tweaked the classic recipe by making mine round and using maple syrup instead of spiced honey. I liked the idea, but I don’t think the spices that you mix in with the nuts complement the maple flavor that well. I doubt it’s the cinnamon, so it’s probably the allspice or the clove, or both, that’s not playing nice with maple. That didn’t stop my friends from enjoying it, though.
The dough got pretty thin and translucent.
The full recipe is here. I’ll just add a tip for rolling out the phyllo dough, if you are ever possessed to do this yourself. It’s not as hard as you’d think, and you can use a regular rolling pin even though they suggest a wooden dowel. But when you roll out dough, you create new surface area, and so even though you floured the dough and the counter, you still get sticky areas. If you’re rolling out something this much, you have a lot of sticky area. So I tried buttering my work surface instead of flouring it. After rolling a piece, it came right off of my counter instead of needing a lot of gentle prodding like before. And then I had a head start on the buttering that you do to make the baklava.
I only baked mine once, for about 30 minutes, whereas the recipe has you do that twice. Mine probably could’ve used some more time in the oven, but I think another full 30 minutes would have been too much.